Windows XP high performance settings (part I)
You can change the taskbar and the Start Menu with the option Taskbar and Start Menu in the Control Panel. On the tab Taskbar, you can switch on all options. By default the taskbar is show at the bottom, I prefer the option to hide the taskbar (you can show the taskbar by moving your mouse down or even quicker with the Windows-key). Hiding is done by enabling the option Auto-hide the taskbar. Most option are described on the page about the Start Menu and the Quick Launch toolbar.
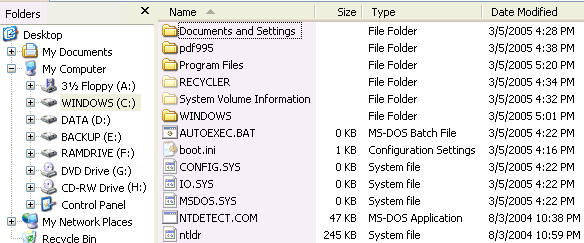
Browsing your hard disk (CD-ROM, floppy disk, memory card, external hard disk, ...) is done with the Windows Explorer. Besides that, the Windows Explorer is very easy to copy and/or move files and folders and creating new folders. You will find the Windows Explorer by Start, All Programs, Accessories, icon Windows Explorer. This is a very strange location, first thing to do is placing it on a logical location: right click the icon and select pin the program to the start menu (now it is quickly available in the start menu).
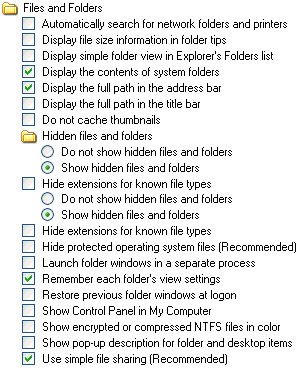
By default, many (system) files and folders are hidden. If you are not that experienced, you probably like this setting, but I prefer to see all files and folders. For that purpose, I especially like the following changes within the Windows Explorer: Tools, Folder Options, tab View:
With some other changes, the folder options should look like this:
|
|
I prefer to disable the first option (Automatically search for network folders and printers), if there are no files and printers to share on the network. Showing files and folders will be noticeably faster. If there are troubles with one of the Windows of the Windows Explorer process, all Windows will be closed automatically. If you don't like this setting, you can enable the option Launch folder windows in a separate process (remember that enabling this option, Windows Explorer will use more system resources).
Furthermore, I prefer to see all file and folder details (filenames, dates, file size, file type): this makes analyzing your files a lot easier. To view all details, like below: View, select Details. Go back to Tools, Folder options, tab View, button Apply to All Folders, to make sure all folders will have the detailed view.
SHOW SMALL PICTURES IN STEAD OF A DETAILED VIEWGo to your My Pictures folder, which will be in details as well. If you are used to see the small pictures, change the view by View, Thumbnails (instead of Details). |
FASTER OPENING FOLDERS WITH AVI-FILESBy default, opening folders containing AVI files (audio/video) can be
very slow because Windows is trying to extract non important information. This
can be solved, by deleting the following key with the
registry editor: |
WINDOWS EXPLORER TIPSIf you think the file view is not up to date, you can update/refresh it with the key F5 (just like the Internet Explorer). With the key combinations CTRL-C/CTRL-X you can respectively copy/move files/folders and place them on a different location with CTRL-V. The key combinations SHIFT-HOME and SHIFT-END and/or the SHIFT and CTRL can be useful if you would like to select multiple files/folders. |
DISABLING AUTOMATICALLY EXPANDING FOLDER TREESThe folder view on the left in Windows Explorer automatically expands
if you click on a folder containing sub-folders. You can disable this function
with a registry tweak: change the DWORD-value FriendlyTree to 0
(instead of 1) in the following key: |
To setup a screensaver, right click the dekstop and select Properties, tab Screen Saver. The most valued screensaver is probably the slideshow of the personal pictures (My Pictures Slideshow). In this window, the option On resume, password protect can be activated to make sure that user has to unlock the welcome screen (by entering the password of the user account) to gain access to the user interface. Another (power saving) option is to switch off the monitor when the computer has not been used for a certain amount of time. The amount of time to switch off the monitor and the hard disk is set at Power options in the control panel, tab Power Schemes (also available by the button Power at the bottom of the tab Screen Saver). The time to wake-up of modern monitors is very short, which makes it a good alternative compared to a screensaver.
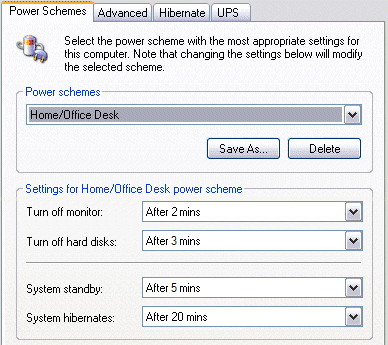
The tab Power Schemes can be used to change the stand-by and hibernation settings (the hibernation option can be used only when this option is activated on the tab Hibernate!) to save energy. When the option system stand-by is activated, the computer is switched to energy saving mode but stays 'on'. Hiberantion really switches off the computer by saving the memory (which includes the running programs) into the hibernation file C:\HIBERFIL.SYS (the filesize of this file is exactly the same as the total amount of RAM memory, so disabling hibernation will save a lot of disk space!). After the computer has been turned on again, this file is loaded in the memory which results in a relatively quick boot compared to a normal boot of Windows. This energy saving feature is especially useful for laptop comptuers because they have a limited amount of power in the batteries. By the way, it is also possible to manually switch the computer to hibernation by clicking Turn Off Computer in the Start Menu, pressing the SHIFT key will change the button Stand by into Hibernate. Another option is to program the on/off button (at the front of the computer) at the tab Advanced to apply hibernation after pressing this button (after this change, switching off the computer has to be done by the Start Menu!). It is advised not to use the hibernation without a frequent reboot of Windows, to prevent errors.
TIP: If it is not possbile to enable hibernation on the tab Hibernate, verify the support for APM (Advanced Power Management) or ACPI (Advanced Conifiguration and Power Interface) in the BIOS: for the use of the hibernation feature, it is necessary that this option is enabled. If this is already the case but the option to activate the hibernation is still not available, then probably the motherboard drivers have to be installed.
ATTACHED USB DEVICES DON'T OPERATE ANYMORE AFTER WAKING UPIn case specific USB devices (like the mouse, keyboard, printer, scanner, e.a.) refuse to work after returning from hibernation make sure the latest available motherboard drivers are installed. If this doesn't solve the problem, make sure the USB devices won't hibernate as well. Open the Windows Device Manager, navigate to the Universal Serial Bus controllers, right click the USB Root Hub (repeat this procedure when there are multiple hubs), select Properties, tab Power Management and deactivate the option Allow the computer to turn off this device to save power. Notice that this is not an energy saving change.… |
DISABLE THE WELCOME SCREEN AFTER WAKING UP FROM STAND-BY/HIBERNATIONWindows shows the welcome screen by default after the computer returns from sleep or hibernation, even if the user account isn't provided with a password! This security option can be disabled by the sub Power Options in the control panel. Select the task Require a password on wakeup in the task pane, click the link Change settings that are currently unavailable and activate the option Don't require a password. Even if no password has been set to the user account, Windows show the window to unlock the computer after the computer returns from the stand-by or hibernation! If this window is not desired, it can be disabled by the option Power Options in the control panel. Select the tab Advanced and deactivate the option Prompt for password when computer resumes from standby. |
By right clicking the Recycle Bin (desktop) and select Properties you are able to change some recycle bin settings. I prefer to keep them unchanged. Did you know that you can delete files and folders bypassing the recycle bin? You can achieve this by deleting them while you hold down the SHIFT-key. If your fingers were faster there your brains, you might delete files, you wished you didn't. No problem, with the PC Inspector File Recovery utility (download: www.pcinspector.de) you are able to recover those files, even if you have emptied your recycle bin. Install this utility first, for possible future use! If you overwrite a file, you won't be able to recover it anymore.
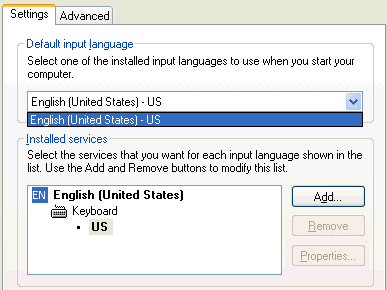
You were probably asked what keyboard layout you have and what the default input language is. If there is more then one layout, you can change with the left ALT key combined with the right SHIFT key. Sometimes you hit this combination by accident, which will result in a strange keyboard layout. If you don't know better, you have to restart Windows to solve this issue (know you know better.....). By removing the unused keyboard layout, you won't have this problem anymore You can change those settings by Control Panel, Regional and Language Options, tab Languages, button Details. Remove the unused installed services (the bold one is the active service).
EURO SIGNThe €-symbol is probably available with the key combination ALT-5 or with the ASCII code 0128 on the numeric keyboard (hold down the ALT-key). |
INSTALLING FONTSBe careful installing extra fonts, these fonts use a lot of system resources. You can change the fonts by Control Panel, Fonts. |
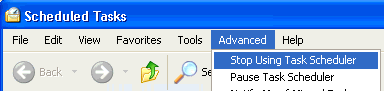
The task scheduler enables automatic scheduled tasks (like regularly downloading of virus definitions). Many applications need this service. If you prefer to do everything yourself, you can disable the task scheduler, as show below:
TROUBLES TASK SCHEDULER WITHOUT USER ACCOUNT PASSWORDIf you use the task scheduler, there is a chance it doesn't function well
because you are not using a password on your user account. This can be solved
with a registry tweak with the registry editor. Change or add the DWORD-value limitblankpassworduse
with value 0 in the following key: |
You can disable the irritating sounds of your Windows system. Go to Control Panel, Sounds and Audio Devices, tab Sounds and disable it at the Sound scheme combo box. You can also partly disable sounds in the Program events area. On the tab Volume you can manage the sound volume and (if you wish to do so) disable the volume icon in the taskbar.
By default Windows XP installs some extra software and tools, while you also have the possibility to install some extra. Go to the Control Panel, Software, tab Add or Remove Programs. Check them all and select/deselect items of your choice, for example you could decide to (de)select the Fax console or the Windows Messenger.
MORE WINDOWS SOFTWARE ITEMS TO DISABLEYou can add hidden items to the list of software by following the next steps (to
be able to remove them from your system): |
By Control Panel, Internet Options you are able to change the Internet Explorer settings (this option is also available in the Internet Explorer through Tools, Internet options). First change the default page with one of your favorites, mine is a blanc page (or www.google.com).
Windows XP high performance settings (part I)
© 2001-2022 - Menno Schoone - SchoonePC - Rotterdam - The Netherlands