This page is about a "must have" rescue tool: BartPE (known as Bart's Preinstalled Environment, www.nu2.nu). BartPE is a bootable CD based on the operating system Windows XP. Because BartPE is based on Windows, it offers some interesting features in solving Windows related problems. This page describes how to create the bootable CD BartPE, how to add features and what situations the tool can be used for.
TIP: The procedure to create VistaPE (a PE based on Windows Vista) is a lot easier then the procedure below for BartPE (a PE based on Windows XP). Both bootable CD's are able to mount a NTFS partition (of both Windows XP and Windows Vista).
BartPE (also known as "admin's best friend") is based on Windows, which makes it suitable for the maintenance of Windows and to rescue files which are no longer accessible in case Windows won't boot anymore. Here are some of BartPE's features:
|
|
WinPE (Microsoft's tool Windows Preinstallation Environment) is used by system builders to install and configure the Windows operating system on new computers. WinPE is commercial software and only available for system builders. Bart Lagerweij saw the advantages of this tool and decided to develop his own PE, named BartPE. BartPE is NOT supported by Microsoft and has almost no limitations.
BartPE vs. WinPE
Bart saw the advantages of a Windows based 'Preinstalled Environment' and
decided to build a PE without the license issues, so it would become available
for a bigger audience. After analyzing WinPE, he came to the conclusion that it
was possible to create a similar PE based on the installation files of Windows
XP. This bootable CD, based on Windows XP, is now known under the name BartPE.
At first, developing BartPE wasn't possible without arguing about the license issues with Microsoft... The first release (April 2003) was almost similar to WinPE, which resulted into copyright issues with Microsoft. Some versions later, this problem was solved. At this moment, BartPE contains (contrary to WinPE) a simple menu structure and is extendable with additional features just by adding plugins. Especially because of the plugins made by others, BartPE is one of the most popular bootable CD's at this moment!
According to the website www.nu2.nu, Bart is working on a renewed version since October 2006 but till now Bart didn't have enough time to develop a new version of BartPE. Although there are some plugins which are hard to get them working, the current version of BartPE is still working fine. Although there will probably never come a Windows Vista version of BartPE, the current version can also be used for mounting Windows Vista partitions.
Using BartPE to copy personal files to a safe location
One of the most important features of BartPE is the option to copy files to a
safe external location. This feature is extremely useful, especially in case
Windows won't boot anymore. Because BartPE is Windows based, it has no problem
mounting the NTFS file system and accessing USB connected storage locations (an
external hard disk, a USB stick or flash memory, automatically recognized). The
combination of these two properties makes BartPE the perfect tool for copying
files to a safe location. Besides this support, the user interface is very
familiar for most users.
Of course there are other options to access the personal files as well (like connecting the hard disk as slave to another Windows computer), but these methods are more time consuming than BartPE.
It is not possible to download an image of BartPE because it is not allowed to distribute the Windows installation files. But this would not be practical because that would make it impossible to add plugins for additional features. BartPE is build with the free tool PE Builder (download: www.nu2.nu/pebuilder/#download) while using your own, original Windows XP installation files. After installation, PE Builder is available by the shortcut in the Start Menu and the desktop.
Searching for the Windows XP installation files
The original Windows XP installation files are needed to build the bootable CD.
If possible, use the already installed files of the current Windows XP
installation or otherwise copy the files of the original Windows XP installation CD
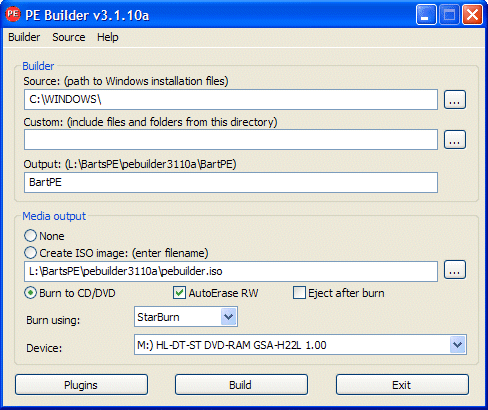
to a special folder on the hard disk. In the example below (the main PE Builder
window)
the folder mentioned at Source
is the current Windows folder. The
Output folder (the installation folder of PE Builder) is used for
building BartPE.
In the second pane (Media output)
describes the options for burning BartPE on CD/DVD.

The first time PE Builder is started, the user is asked whether PE Builder must search for the original installation files. If this question has been clicked away, select the option Search (available by Source in the menu bar) and click Yes on the question Search for Windows installation files? (can take some time). In the example below, PE Builder found three source locations with usable installation files, each of the found locations is suitable (the source location on the C: partition contains the installation files of the already installed Windows, the J: partition contains a copy of the original installation files and the L: partition contains a slipstreamed version). When PE Builder can't find any usable installation files, it is still possible to use the original Windows XP installation CD.
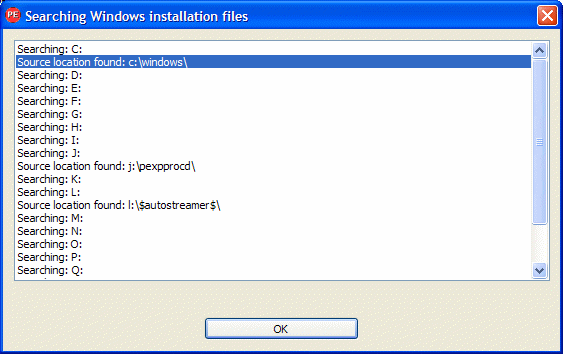
Click the button OK and select one of the found locations in the next window (the installation files which have been slipstreamed with the latest service pack are preferred). All locations in this example contain the installation files of Windows XP Professional and are already slipstreamed with Service Pack 2.
TIP: The Windows XP installation CD is also accessible directly from the main window of PE Builder: click the button ... (next to the option Source) and browse to the volume letter of the CD/DVD player. It is better to copy the installation files to the hard disk first, because this will prevent placing the installation CD manually each time PE Builder is used to build BartPE
Building the bootable CD BartPE
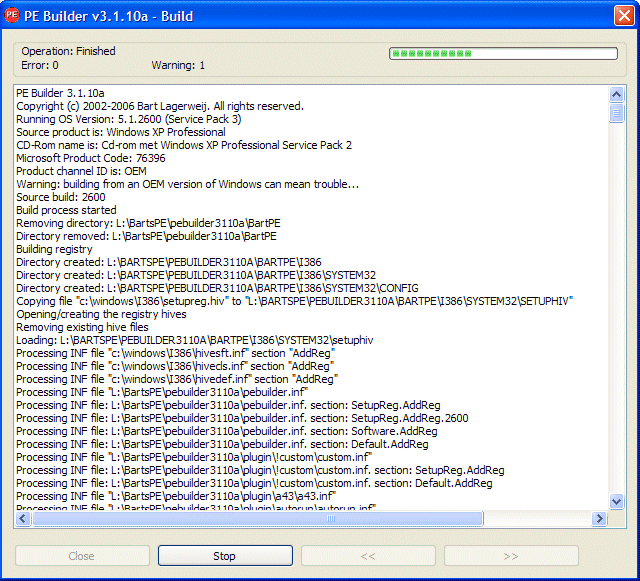
Click the button Build in
the main PE Builder window and the process of collecting, ordering and
processing the files needed for BartPE starts. When PE Builder has finished, the
log file shows the errors and warnings (use the arrow buttons to browse the
log). If there are errors, the problem that causes the error has to be solved
first before it is possible to burn the BartPE CD. When the folder C:\Windows
of an OEM Windows version is used as source for PE Builder, the user is warned
that in theory there could be some compatibility issues. Practice will tell if
this is the case.
Burning BartPE on CD
After PE Builder has processed the installation files and plugins, it is time
to burn BartPE on CD (or DVD). For some computers, additional hardware drivers
are needed to get BartPE working. When the hardware (especially the hard disk)
is not supported, it will be clear when the computer boots the CD. Because it is
normal to burn BartPE multiple times before the definitive version is realized,
it is wise to use rewritable CD's (CD-RW). The CD is burned directly from the PE Builder
script, but only when an empty, writable CD is placed in the burner before the
button Build has been
clicked. If this is not the case, PE Builder will skip the last step of burning
the CD without asking for an empty (re)writable CD.
In some cases, it is wiser to create an ISO image first and to burn it with your own burning software (and not to use the PE Builder build-in burning feature). Burning software like Nero has more options to control the burning process, like lowering the burning speed to get a more accurately burned CD (which can be used on older CD/DVD players as well).
It is possible to boot BartPE from flash memory of USB stick as well, but only when the BIOS of the computer supports booting from these media. Compared to a bootable CD, it takes some more effort to create BartPE on bootable flash memory. The next steps has to be done:
ATTENTION: When the flash memory is booted, a virtual RAM disk is created to temporarily store the ISO image with BartPE. When there is not enough RAM memory available to store the ISO image, an error message is shown that it is not possible to load BartPE. This problem is solved by limiting the number of plugins for BartPE in the PE Builder. If possible, use the write protection option of the flash memory to make sure the stored files can't be deleted or damaged.
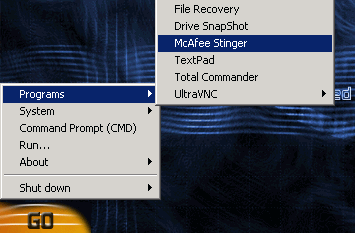
After the CD has been burned, it can be booted on (almost) all computers by placing the CD in the CD/DVD player and rebooting the computer. If the computer won't boot the CD, check the boot order (which is stored in the BIOS settings). As soon as BartPE is booted, the start menu is shown by clicking the button Go:
Change some settings
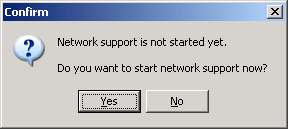
After BartPE is booted, some settings can be changed. One of the settings is
asked for when BartPE is started: if you would like to use network support, it
has to be confirmed (answer No when network support is not needed).
Another setting is the screen resolution, which is changed by Go, System, Display (there
are no wide screen resolutions available yet).
ATTENTION: If BartPE misses some features (like an inaccessible hard disk or no network support), then additional drivers have to be added to the CD (how to do this, is discussed later on).
Using the file manager
Like mentioned earlier, BartPE offers support for partitions with the NTFS file system (there are not many bootable CD's which do...). In BartPE, the default file manager A43 File Management Utility is used to read, copy, edit and delete files on these partitions. BartPE offers support for USB sticks and other flash memory as well! The combination of these two properties makes BartPE the perfect tool for copying files to a safe location, especially when it is no longer possible to boot Windows. It is also possible to edit, move and/or delete files which are not accessible within the normal Windows environment because they are occupied by other running processes.
TIP: With the free Windows version of Partition Saving (download: www.partition-saving.com) it is possible to create an image of the Windows partition (which can be stored directly to an external hard disk). The page about creating a system image explains in detail how to do this.
For the proper functioning of BartPE, it is sometimes necessary to add some features. Think of slipstreaming the installation files with the latest available Service Pack, adding drivers for SATA, RAID and/or SCSI controllers (to support the connected hard disks) and/or add drivers for a specific network adapter (to get access to the internet and/or network).
Slipstreaming the Windows -installation files
To create BartPE, the installation files have to be slipstreamed with at least Service Pack 1.
For an optimized result, it is better to slipstream with the latest available
service pack (Service Pack 3).
By slipstreaming the update files into the installation files, they are
integrated to new installation files (the original installation files are
overwritten).
Slipstreaming is simple, but time consuming. Download the latest available Service Pack (download: www.microsoft.com) and place it on a logical location, for example the working directory of PE Builder. In the menu bar of PE Builder, select Source, Slipstream and browse at the item Service Pack to the saved Service Pack file. After clicking the button OK, the installation files will be slipstreamed with Service Pack 3. Similar to this procedure, it is also possible (but not necessary) to slipstream the updates which were published after SP3.
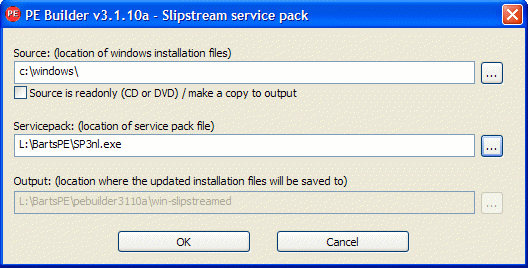
To prevent overwriting of the original installation files, check the option Source is readonly (CD or DVD) / make a copy to output. This will first copy the installation files to the PE Builder location (Output) before they are slipstreamed with the Service Pack. Slipstreaming takes a lot more time, but has as advantage that the original installation files are not changed. This option is also necessary when the original installation CD is used, but cause problems when the installation files are copied from the original Windows installation. After slipstreaming, make sure that PE Builder uses the slipstreamed files as source location (see the main window).
TIP: PE Builder can be used to slipstream the Windows XP installation CD with the latest available Service Pack as well! The slipstreamed installation files can be used for a create a new Windows XP installation CD. However, when these files aren't burned on CD the right way, the CD won't be bootable. Although the setup of slipstreamed files can be started by a MS-DOS command, it is better to use the tool AutoStreamer (download: www.majorgeeks.com) or nLite (download: www.nliteos.com). By the way, slipstreaming of the installation CD is done independently of the product activation and product validation which are postponed till the Windows setup has been finished.
Adding SATA/RAID/SCSI drivers
When it is not possible to access the hard disk after BartPE has been started, then this is probably caused by missing hardware drivers. In this case the drivers for the SATA controller, RAID configuration or a SCSI hard disk is missing. When BartPE has been booted, then it is no longer possible to load the drivers. Loading the drivers is done by pressing the key F6 at the startup of BartPE (follow the instructions in the status bar at the bottom of the setup screen), followed by inserting and reading a disk with the needed drivers.
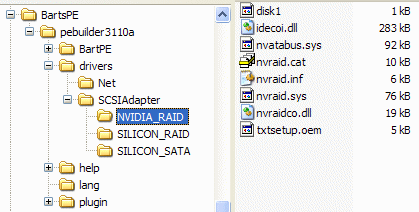
If the drivers needed for the hardware support are known before creating BartPE, they can be integrated into the CD to load the automatically. To add the drivers, copy all files on the driver disk to the subfolder drivers\SCSIAdapters in the PE Builder-locatie. Only the relevant drivers have to be copied to this location, it to much work to collect and add all possible drivers!
Network support: access to the network and internet
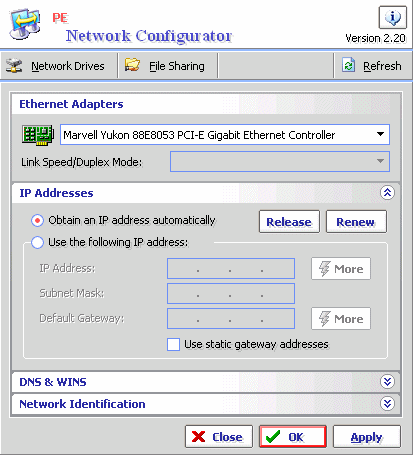
After booting BartPE, the user is asked whether the network adapter must be
activated to connect to the network and the internet. If the network adapter is
supported, the network connection is created automatically by using the DHCP
server of the connected (modem)router (select Dynamic IP Address (DHCP)).
If the network adapter is not supported, but a network connection is desired, the driver for the network adapter has to be added to BartPE. Copy the drivers to the folder drivers\net of the PE Builder location (burning a new CD is necessary). The drivers are mostly available on the CD belonging to the motherboard. If this CD is not available or the drivers are not working properly then the needed drivers can be saved from the current Windows installation as well. To save the drivers, use a tool like Double Driver (download: www.boozet.org/dd.htm or DriverMax (download: www.innovative-sol.com/drivermax), run from the current Windows installation.
TIP: By adding the ready for use Firefox plugin as well (available for download by the website http://oss.netfarm.it/winpe/), BartPE can be used to browse the internet after the network connections has been activated.
By default, BartPE has only a few tools available, but additional tools can be added easily. This is done by adding (ready to use or self made) plugins to the PE Builder location. Thanks to these plugins, BartPE is one of the most popular bootable CD's! Because the creation of plugins is not that complicated, for many tools plugins have been made by a wide range of users (and software manufacturers...) and made available for download on different websites.
Default plugin settings
Every plugin contains three different basic files: a HTM, INF and XML
file. These files must be placed in a sub folder of the folder plugin on
the PE Builder location.
The HTM file contains information about the plugin and instructions how
to apply the plugin (this file is read by a browser like
Internet Explorer).
The files with the extensions INF and XML are necessary for the
integration of the plugin into BartPE.
The next step is to add the program files needed for the plugin. In most cases, they can't be downloaded together with the plugin because of copyright issues. In most cases, the download location of these files is mentioned in the HTM file. The location to save the program files is mentioned in the HTM file as well, in most cases it is the sub folder files.
Activating the available plugins
The PE Builder location contains some plugins by default. Some of them are
already active while others are worth activating (for example the plugin Total Commander).
The plugin files are available on their location, only the program files need
to be downloaded and added to the folder files. When the plugin is activated and all files are available, the PE Builder will integrate them into
BartPE.
Searching for valuable plugins
However, the most interesting plugins are made available by others and must be
downloaded and added manually (just like the program files). Unfortunately,
plugins aren't always updated in time which makes it difficult to get them
working properly. The website
for BartPE has a list of web pages with interesting plugins (www.nu2.nu/pebuilder/plugins/).
Implementing plugins
Implementing plugins is standardized: download the plugin (in most cases archived in a ZIP or CAB file), unzip the archive and copy the
files in a sub folder of the folder
plugins of the PE Builder location. The next step is to download the
program files and placed in the folder mentioned in the HTM file (in most cases
the sub folder files).
When files are forgotten, PE Builder will show an error message automatically
with information about the missing files. For example, if a specific DLL
file is missing, this file can be searched for on the same computer using the Windows
Explorer or by using a search engine to search the internet. When the file is
found, it can be stored in the folder files.
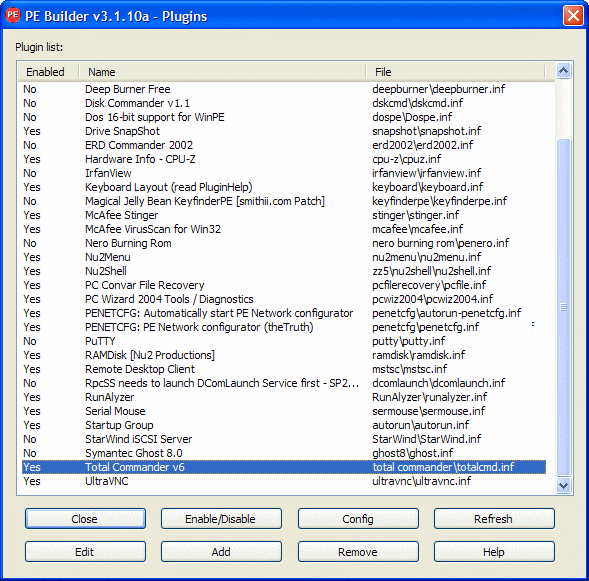
TIP: Click the button Plugins (available in the main PE Builder window) to verify the correct installation of the plugins. The column Enabled shows the active plugins.
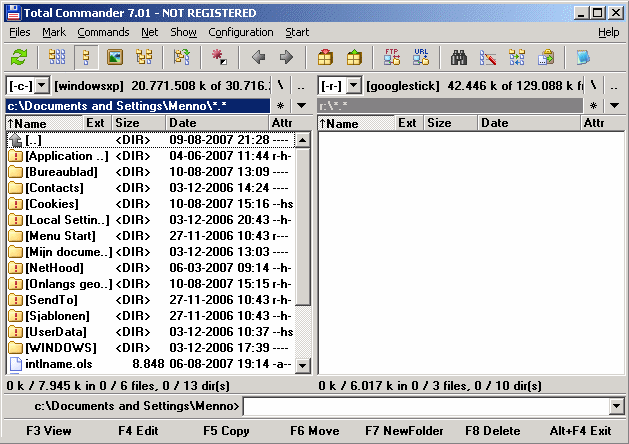
For browsing the file system, BartPE has got the A43 File Manager Utility available, which is comparable to the Windows Explorer. Copying, moving and deleting files is no problem for this file manager, but more experienced users prefer the more advanced file manager Total Commander (with two pains). This program makes it a lot easier to copy files from the hard disk to a safe location and should be missing on any BartPE.
Using the default available plugin for Total Commander, BartPE is extended easily with this tool. Download and install Total Commander (download: www.ghisler.com) the normal way into the current Windows installation (by default into the folder C:\totalcmd). Copy all the files (using the Windows Explorer) in this folder to the sub folder \plugin\total commander\files of the PE Builder location.
By clicking the button Plugins, the plugin for Total Commander can be enabled to integrate it into BartPE. Scroll downwards, select the option Total Commander v6 and click the button Enable/Disable and make sure that the column Enabled is labeled Yes in stead of No (see the picture above). After the BartPE ISO has been burned on CD, Total Commander is available by the start menu (Go, Programs, just like the A43 File Manager Utility). For a not registered version (registration is not needed), every time Total Commander is started, a pop-up comes up which has to be answered with 1,2 or 3. In both the right and left pane, a location can be selected to copy, edit or delete files. The F5 is used to copy files from one pane (e.g. the hard disk) to the other (e.g. the external storage location). To make sure the external storage location is available, the hardware must be connected at startup of BartPE (afterwards, the media won't be recognized anymore).
TIP: Visit the page about creating VistaPE (a Windows Vista based PE), the procedure for building VistaPE is a lot easier. Both bootable CD's can be used to get access to partitions with the NTFS file system (of both Windows XP and Windows Vista).
© 2001-2022 - Menno Schoone - SchoonePC - Rotterdam - The Netherlands