
This page informs about replacing your hard disk with a new one. This will give you more free space to store your files, but most importantly will speed up your Windows! Eventually your old hard disk can be reused to create a back-up of your personal data as an external storage location (Creating an automatic back-up with SyncBack).
If you replace your old hard disk with a new one, you will have to reinstall Windows. By disconnecting the old hard disk temporarily, your personal data is safe. If you encounter problems you are still able to reconnect your old hard disk and boot from you old Windows. If you are satisfied with the new setup, you can reconnect the old hard disk as secondary hard disk or in an external hard disk case to transfer the personal data to the new hard disk.
You have to change all settings and reinstall all software as a consequence of reinstalling Windows. By imaging you are able to prevent all these time consuming operations because all data is copied exactly to the new hard disk. The next step is switching the hard disks and you are finished. More information how to do this later on.
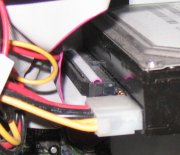
It's not that difficult to replace your old hard disk. Disconnect the power first and open the computer. Usually, the hard disk is within reach and connected with an IDE cable of 80 or 40 wires. Disconnect this cable and the power connector (yellow, red and black wires) carefully. Unbolt the hard disk and replace it with the new hard disk.
In most cases there are two IDE-controllers available on the motherboard, named primary and secondary IDE-controller. On both connectors an IDE cable can be connected with each the possibility to connect two hard disks, CD or DVD player (four in total). One of them is called the Master and the other Slave. The old hard disk is probably connected as Master to the first IDE controller.
ATENTION: There is a difference between IDE/PATA hard disks (in this case) and SATA hard disks (which are connected with a small cable). The procedure for replacing a SATA hard disk is similar to IDE hard disks, except there is no need to set a Master or Slave setting manually. Be careful if two SATA hard disks are configured as a RAID configuration (two or more hard disks cooperate together). Be aware that a SATA hard disk can only be placed in an external case with SATA support.
IDE versus SATA connection
|
|
At the back of a IDE hard disk (where the cables are connected), you will see the possibility to place a jumper. The jumper setting determines whether the hard disk will operate as master, slave or cable select (CS). The setting of your current hard disk will be master or cable select. In most cases an indication of the jumper settings is available somewhere on the hard disk.
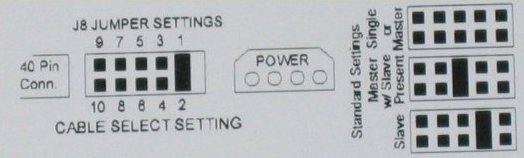
Follow the instructions to set the new hard disk to master because it will replace the old hard disk.
TIP: Some hard disks have the option to choose between "SINGLE or MASTER", "SLAVE" and "MASTER (slave present)". Choose the first option if there is no hard disk or CD player connected with the same IDE cable. If there is a slave present (hard disk or CD player), you have to choose the third option: master (slave present). In the example above there is chosen for this option. By removing the jumper, the hard disk will be set to master whitout a second IDE disk connected.
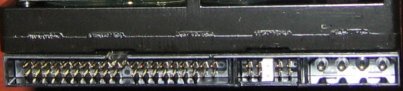
Connecting the cables is easy, there is only one way to connect them! In most cases the IDE cable is colored at one side. This side of the cable indicates the connection of the first pin. If the numbers of the pins are mentioned somewhere near the IDE connection on the hard disk (0-19 en 20-39), it's clear how to connect the cable. In most cases the first pin is located to the left of the jumper settings.
If all cables are connected, switch on the power and make sure the bios recognizes the new hard disk. In most cases, this information is shown on the screen. You will see something like primary master, primary slave, secondary master and secondary slave. If you are not sure, start the BIOS setup (press DEL for most motherboard) and check the IDE settings.
ATENTION: There is no operating system on the new hard disk which will result in an error message. Don't worry, this will be fixed by installing Windows or by imaging Windows from the old hard disk.
TIP: In some cases the BIOS does not recognize the new hard disk because at the time of creating the specific BIOS there was no such hard disk. In most cases this can be fixed by updating the BIOS (see the motherboard manual for instructions how to do this). With a tool like CPU-Z (download: www.cpuid.com) you are able to determine what type of motherboard is used. By placing the old hard disk as master you are able to boot Windows to be able to search the internet.
Now, it's time to setup Windows by booting the Windows CD. At the moment of choosing which partition to use for the Windows setup, you are able to set a smaller size of the Windows partition in comparison to the whole hard disk. For more information on partitioning read the partitioning hard disk.
ATENTION: If the setup results in a Windows partition which is not C:, reboot the computer and restart the setup procedure! This is the case when there are no partition at startup while the CD player will receive C: as drive letter.
After reinstalling Windows on the new hard disk, it's time to restore the personal files which are safely stored on the old hard disk. There are two options: insert the old hard disk into an external case (see the page about creating a backup automatically) or connect the hard disk as slave or as secondary master. Be aware of the correct jumper settings in case of the second option (probably it's easier to disconnect the CD-player temporarely).
Windows will recognize the hard disk automatically. In the Windows Explorer, you will see one or more extra drive letters appear which correspond to the partitions on the old hard disk. The page about creating a backup of personal data tells you the default location of personal data, if you are not able to find them.
Installing a new hard disk as secondary hard disk just to be able to store more data would be a waste of resources. In most cases the hard disk is much faster compared to the old one. It's wise to install Windows on the fastest hard disk (in most cases I prefer to install a new hard disk instead of adding memory; a new hard disk will give you more value for your money). Of course, it takes a lot of time to reinstall Windows. If your current Windows installation still works fine, there is a simple trick to copy (image) Windows with all settings and data from the old hard disk to the new hard disk. As mentioned before, the old hard disk can be used as backup location. To summarize: always install Windows on the fastest hard disk.
ATENTION: After the complete hard disk (Windows + personal files and settings + current misery) is imaged to the new hard disk, there is no need to copy personal files anymore. It's an exact copy of all the files which saves you a lot of time!
So, if you are satisfied with the current Windows installation my advise would be to image the old hard disk to the new one. This procedure saves a lot of time! This is done by connecting both hard disks as described below:
LET OP: If you don't like to disconnect the CD/DVD-player you can also connect the new hard disk (3) as a SLAVE on the first IDE-cable. To do this, you probably have to change the jumper settings of both hard disks which will be unpractical if the old hard disk is still in place.
To copy all the data including the operating system from the old hard disk to the new hard disk, you need extra commercial software like Norton Ghost or True Image. But actually you can also do this with free imaging software: Partition Saving (download: www.partition-saving.com) which has been discussed on the page about creating a system image. The only thing you have to do is create a bootable MS-DOS disk (www.bootdisk.com, I prefer Windows ME Custom, No Ramdrive). Download the zip file and copy the file savepart.exe to the disk.
TIP: HDClone (download: www.miray.de/download/sat.hdclone.html) can be used as an alternative tool to copy the data from the old to the new hard disk easily within a Windows environment (in stead of MS-DOS). The freeware version has some limitations compared to the commercial version (like some missing features and a slowed down transfer speed). However, these limitations are no problem for cloning the hard disk.
LET OP: If there is no floppy drive on your system, you can temporarily connect one to the motherboard. Another option is creating a bootable MS-DOS CD-ROM based on a bootable floppy. Of course, this must be done on a computer with a floppy drive. creating a bootable CD-ROM can done by Nero Express (select bootable data-CD where you can use the bootable floppy as image for the boot sector of the CD-ROM).
After you have booted in MS-DOS you can enter the command SAVEPART which will give you the following options:
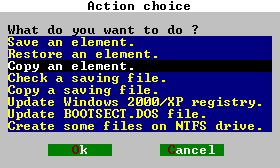
Select Copy an element. In next window you select Disk number 0 because you want to copy the old hard disk which is probably the first if you followed the above instructions. The screen also shows the second hard disk, called Disk number 1. The size of both entries are also given, which is a verification of the chosen hard disk. The smallest hard disk must be the old hard disk.
In the next windows you choose to copy all sectors by selecting Disk - all sectors. The next question will be what hard disk to copy to. Probably there is only one left, the new hard disk: Disk number 1. After a check and a warning, all sectors will be copied to the new hard disk. This process may take some time, but it's worth waiting for!
ATENTION: Make sure you are copying from the old hard disk to the new hard disk, else you will overwrite and lose your current data! This problem only occurs when the new hard disk is smaller or equal to the old hard disk (else there will be an error message).
After Partition Saving has finished, switch off the computer, disconnect the old hard disk and connect the new hard disk as (primary) master on the first IDE cable, formerly used by the old hard disk. Reconnect any disconnected CD player and store the old hard disk on a safe location. Reboot the computer and find out if Windows boots. You will probably notice that Windows boots a bit faster then before, caused by the faster hard disk.
The partition(s) on the new hard disk will have the same size as before. There is still a part of the hard disk which is not used (if a 80 Gb hard disk is replaced by a 250 Gb hard disk, there will be approximately 170 Gb left over). By creating an extended partition with Windows Disk Management (Control Panel, Administrative Tools, Computer Management, Disk Management), this area can be used as well.
© 2001-2022 - Menno Schoone - SchoonePC - Rotterdam - The Netherlands