By default, the personal files (documents, pictures, music, videos, e-mailarchive, contacts, e.g.) are stored on the Windows partition, next to the system files. As you can imagine, this is not the most practical storage location... That's why I prefer to separate the personal files (like documents, pictures, videos, e-mail, contacts e.g.) from the system files by moving them to another storage location (a special data partition). It is important to move the files the right way, to make sure Windows is aware of the change and will use the new storage location in future. For that reason, this page not only describes which personal files can be moved to the data partition, but also how it is done properly!
LET OP: Although it can be done differently, this page assumes that the new storage location is a separate data partition with the disk letter D:. Furthermore it is assumed that Windows is installed (as usual) on a partition with the disk letter C:.
The
advantages of a data partition
By creating a personal folder on the data partition for each user account (like
D:\Menno), it becomes easy to keep the overview. It becomes even very
easy to back-up
the personal files automatically and because the other partition keeps
untouched by reinstalling Windows (possibly by using a
system image), the files are
stored safely.
Especially when Windows won't boot anymore, it is nice to have quick access to
the data partition!
The page about partitioning the hard disk describes how to create additional partitions in the case Windows has to be reinstalled. If a reinstall of Windows is not desirable, resizing the Windows partition to create free space for a data partition (by using the Windows Disk Manager) is an option as well.
TIP: Another option is to create a data partition for each user account. This setup has the disadvantage of less efficient use of the available space...
How to let Windows know what the new storage location is
If moving the personal files is done the right way, the settings for the
used storage location are changed automatically. However, in some cases a manual
change is needed, for example by changing a registry value...
ATTENTION: Move the folders for storing the personal files as quickly as possible after (re)installing Windows, if possible before additional software is installed. If a personal folder is moved and the program isn't aware of the new location (which does not happen frequently), then it is logical that the program can't find the files anymore...
UNHIDING THE FILESBy default, the most files which are discussed here are hidden in the Windows Explorer because they are system or hidden files. For Windows XP, thes files can be shown by changing the following setting in the Windows Explorer (Tools, Folder Options, tab View):
Within Windows Vista, the following settings can be changed (by the button Organize in the menu bar of the Windows Explorer, Folder and Search Options, tab View):
|
|
|
This part explains how to change the default storage locations of the personal files and folders in Windows XP. Changing the default storage location of the personal folders can only be done when the specific user account is logged on, therefore the procedures below have to be done for each user account separately!
The My Documents folder
First create a personal folder on the data partition for the logged on user
account and a subfolder named Documents (e.g. D:\Menno\Documents).
Then move the folder My Documents (C:\Documents and Settings\loginname\My Documents)
within the Windows Explorer to the new subfolder by right clicking the original
folder (My Documents,
at the left top of the Windows Explorer), Properties, tab
Target, button Move, navigate to the newly created subfolder on
the data partition and click OK.
By clicking the button Apply all documents and subfolders (like the folders My Pictures, My Music) are automaticaaly moved from the folder My Documents to the new folfder. At the same time Windows is informed about the new location, to make it the new default storage location.
TIP: The icon of the folders Mail and Addressbook in the example abover are changed by right clicking the folder, select Properties, tab Customize, button Change Icon and to navigate to the icon. Almost every executable file has these icons, if needed select a different file (e.g. the program which uses the folder).
Outlook Express
By default, Outlook Express
stores the database in the folder C:\Documents and Settings\loginname\Local Settings\Application Data\Identities\{....}\Outlook
Express. This folder contains multiple DBX-files to store the received and
send e-mail. First, create a subfolder on the data partition (e.g. D:\loginname\Mail).
The next step is to change the storage location from within Outlook Express,
this is done by Tools, Options, tab Maintenance, button Store Folder,
button Change, navigate to the new folder and confirm with the button OK.
After restarting Outlook Express, the original e-mail archive is automatically
moved to the new location.
ATTENTION: To make sure you won't loose any e-mail, first back-up the original DBX files before changing the storage location! In case the e-mail is lost, the original DBX files can still be copied to the new location (by using the Windows Explorer)...
Windows Addressbook
Moving the Windows Addressbook
(by default stored in C:\Documents and Settings\loginname\Application
Data\Microsoft\Address Book\loginname.wab) needs some more effort: a
registry change is needed.
Create a subfolder using the Windows Explorer on the data partition (e.g. D:\loginname\Addressbook).
Move the WAB file by cut (CTRL-X) and paste (CTRL-V) to this
folder. Use the Windows Explorer search feature (Start, Search and
search for '*.WAB') in case this file can not be found on the location
above. Finally open the registry-editor, search for '.WAB' (press
CTRL-F to start the search, press F3
until the registry value for the storage location is found) and change the
registry value which stores the storage location of the addressbook.
TIP: This registry tweak can be down automatically with the tool OE Tweaker (download) as well.
Favorites (Internet Explorer)
Changing the storage location of the folder Favorites (used by
Internet Explorer, by default
on the location C:\Documents and Settings\loginname\Favorites)
is done by just cutting (CTRL-X) and pasting (CTRL-V) it to the
new location (e.g. D:\loginname). The needed registry change is
done automatically, and Internet Explorer will find the new storage location the
next time it is started. Can't be done more easily!
RSS-feeds (Internet Explorer)
Changing the storage location of the folder with RSS-feeds (used by Internet
Explorer, by default stored on the location C:\Documents and Settings\loginname\Local Settings\Application Data\Microsoft\Feeds)
can be moved by cutting (CTRL-X) and pasting (CTRL-V) to the new
location (e.g.
D:\loginname\) as well.
However, the default storage location of the RSS-feeds can not be changed. To let Internet Explorer use the new location, symbolic link (a symlink: on the original location a sort of shortcut is placed to the new location) must be used. The symbolic link can be created by using the Sysinternals-tool Junction (download: http://technet.microsoft.com/en-us/sysinternals/bb896768.aspx). Use the following Junction-command in the command console to create a symbolic link to the folder Feeds:
JUNCTION -s "%USERPROFILE%\Local Settings\Application Data\Microsoft\Feeds" "D:\loginname\Feeds"
This part explains how to change the default storage locations of the personal files and folders in Windows Vista. Changing the default storage location of the personal folders can only be done when the specific user account is logged on, therefore the procedures below have to be done for each user account separately!
The Documents folder
First create a personal folder on the data partition for the logged on user
account and a subfolder named Documents (e.g. D:\Menno\Documents).
Then move the folder Documents (C:\Users\loginname\Documents)
within the Windows Explorer to the new subfolder by right clicking the original
folder, select Properties, tab Location, button Move, navigate
to the newly created subfolder on the data partition and click Apply.
ATTENTION: Always select a folder and never a partition! Changing the storage location to a partition is very hard to undo. If you did select a partition by accident, it is even easier to create a new user account and to transfer the data and settings...
The other subfolders of C:\Users\loginname can be moved as well (like the folders Desktop, Contacts, Downloads, Favorites, Music, Pictures, Videos and Saved Games; the folders Links and Searches are less important). For every folder which has to be moved, create a subfolder of D:\loginname. The original folders (files included) can be moved to the new location by Properties, tab Location. Windows will be informed about the change automatically, so no further action needed.
TIP: Although the official method is preferred (by using the tab Location, as described above), moving the data can also be done just by cutting the folders (CTRL-X) and to past them on the desired location (CTRL-V). This is far more efficient, because they can all be selected and moved at the same time (by using this method, there is no need to create the subolders on the new location first and to move the folders manually by using the tab Location). The remaining folders (with the default color yellow) can be deleted safely.
TIP: The icon of the folders Mail and Calendar in the example abover are changed by rigth clicking the folder, Properties, tab Customize, button Change Icon and to navigate to the icon. Almost every executable file has these icons, if needed select a different file (e.g. the program which uses the folder).
Windows Mail
By default, Windows Mail stores the
database in the folder C:\Users\loginname\AppData\Local\Microsoft\Windows Mail.
This folder contains multiple folders to store the received and send e-mail.
First, create a subfolder on the data partition (e.g. D:\loginname\Mail).
The next step is to change the storage location from within Windows Mail,
this is done by Tools, Options, tab Maintenance, button Store Folder,
button Change, navigate to the new folder and confirm with the button OK
(confirm 3 times).
After restarting Windows Mail, the original e-mail archive is automatically
moved to the new location. The next step is to delete the files and folders on
the original location (using the Windows Explorer). Make sure the
storagelocation is changed correctly and the e-mail is available before deleting
the files!
Windows Calendar
The Windows Calendar database
(C:\Users\loginname\AppData\Local\Microsoft\Windows Calendar\Calendars\loginname's
Celendar.ics)
can be moved using the Windows Explorer. First create a subfolder on the data
partition (e.g.
D:\loginname\Calendar) and move the file loginname's
Calendar.ics by cut (CTRL-X) and paste (CTRL-V) to the new
location.
The next step is to inform Windows Calendar about the new storage location, therefore a symbolic link needs to be created (a symlink: on the original location a sort of shortcut is placed to the new location). Go to Start, All Programs, Accessories, right click Command Prompt and select Run as administrator and give the following MKLINK command (all at one line):
MKLINK "C:\Users\loginname\AppData\Local\Microsoft\Windows Calendar\Calendars\loginname's Calendar.ics" "D:\loginname\Calendar\loginname's Calendar.ics"
Of course the login name and storage location need to be changed to the personal situation. This command only works when the original ICS file is moved to the new location (by cut and paste in stead of copy and paste!). It's no problem to change the storage location and/or to rename the database, but if you do so make sure to change the command as well.
RSS-feeds (Internet Explorer)
Changing the storage location of the folder with RSS-feeds (used by Internet
Explorer, by default stored on the location C:\Users\loginname\AppData\Local\ Microsoft\Feeds)
can be moved by cutting (CTRL-X) and pasting (CTRL-V) to the new
location (e.g.
D:\loginname\) as well.
However, the default storage location of the RSS-feeds can not be changed. To let Internet Explorer use the new location, symbolic link (a symlink: on the original location a sort of shortcut is placed to the new location) must be used. To create a symbolic link to the folder Feeds is done with the following MKLINK command in the Command Console:
MKLINK /d "%LOCALAPPDATA%\Microsoft\Feeds" "D:\loginname\Feeds"
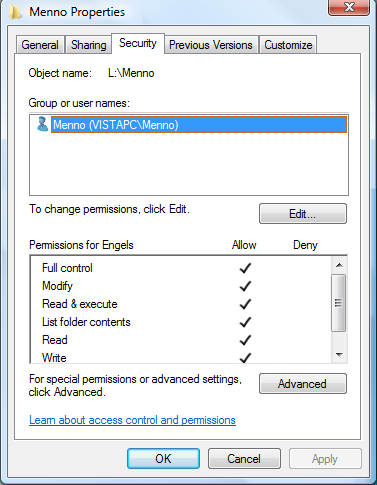
AN ERROR WHILE TRYING TO SAVE DATAAfter moving the personal folders to a special data partition, it frequently happens that the user account does not have the necessary permissions resulting in an error while trying to save data in one of the subfolders of the newly created personal folder. Think about an error when trying to save a website to the favorites or subscribing to a RSS feed or an appointment in the Calendar which has not been saved. These problems are solved by giving the user account full permissions to the files in the specific folder (e.g. D:\loginname\Feeds) by right clicking the folder and to select Properties, tab Security, button Edit, button Add. Enter the name of the user account (e.g. Menno) and click Check Names. As soon as the added name is recognized as your user account, the permissions for this account can be changed by clicking the button OK. Finally the permissions for the user account must be changed to Full Control in the column Allow. |
Most software creates a folder to store personal data, in most cases it will be done as subfolder of the folder My Documents (XP)/Documents (Vista). But some programs use a different location, e.g. a subfolder of C:\Documents and Settings\loginname (XP) / C:\Users\loginname (Vista). For that reason, the personal folders and files of these programs will have to be moved manually. This part describes how to this for a few popular programs.
Windows Live Mail
Windows Live Mail stores the e-mail by default in the folder
C:\Documents and Settings\loginname\Local Settings\Application Data\Microsoft\Windows
Live Mail (XP)/C:\Users\loginname\AppData\Local\Microsoft\Windows Live Mail
(Vista). This folder contains multiple folders to store the received and send e-mail.
First, create a subfolder on the data partition (e.g. D:\loginname\LiveMail).
The next step is to change the storage location from within Windows Live Mail,
this is done by ALT-Tools, Options, tab Advanced, tab Maintenance, button Store Folder,
button Change, navigate to the new folder and confirm with the button OK
(confirm 3 times).
After restarting Windows Live Mail, the original e-mail archive is automatically
moved to the new location. The next step is to delete the files and folders on
the original location (using the Windows Explorer). Make sure the
storagelocation is changed correctly and the e-mail is available before deleting
the files!
Outlook
To change the
Microsoft Outlook database location, the file OUTLOOK.PST has to be
moved. In Windows XP you can find this file in the folder
C:\Documents and Settings\loginname\Local Settings\Application Data\Microsoft\Outlook\
and in Windows Vista you can find it in the folder
C:\Users\loginname\AppData\Local\Microsoft\Outlook\. After Outlook is
closed, the file
OUTLOOK.PST can be moved easily using the Windows Explorer by cutting (CTRL-X)
and pasting (CTRL-V) it in the personal folder on the data partition (e.g.
D:\loginname\Outlook). Now the file is removed from the original
location, Outlook will present an error message because the database
can't by found anymore. Accept the error message, navigate to the new location
of the OUTLOOK.PST file and restart
Outlook.
ATTENTION: If the automatic archiving is activated, the file ARCHIVE.PST must be moved as well! This file can be moved to the same location as OUTLOOK.PST, following the same procedure.
MS Office dictionary
The storage location of the MS Office dictionary file (with personally added
words) can be changed by moving the file CUSTOM.DIC (XP:
C:\Documents and Settings\loginname\Application Data\Microsoft\Proof or
UProof, Vista:
C:\Users\loginname\AppData\Roaming\Microsoft\Proof or UProof)
to a subfolder on the data partition (e.g. D:\loginname\Dictionary).
The next step is to inform Office about this change: start
Word, select Tools,
Options, tab Spelling & Grammar (Word 2007: Office-button, button Options
for Word, task Proofing), button Custom Dictionaries, button
Add.
Other software
For all programs you have to find out the storage location of the stored
personal data. If the program doesn't use the default folder Documents to
store the data, the storage location has to be changed. If there is no setting
to change the storage location, one can still use a symbolic link created by
Junction (XP)/MKLINK
(Vista), similar to the link created for the RSS feeds.
Besides the personal folders for each user account, Windows creates a shared folder as well (XP: C:\Documents and Settings\All Users\Shared documents, Vista: C:\Users\Public). This folder can be used to store files which will be available to all other user accounts as well. Just like the personal folders, the shared folders need to be moved as well. After moving the folder, Windows has to be informed about the new storage location. Although the necessary changes are done almost automatically (if it is done the right way), there are still some changes in the registry which have to be done manually.
Moving the shared folder in Windows XP
Windows XP uses the folder C:\Documents and Settings\All Users\Shared documents
to store the shared files (this folder contains subfolders like Shared
pictures,
Shared music,
Shared video and possibly some shared folders of installed programs). According
to the shown message, the folder Shared documents can't be moved because
it is a system folder which is needed by Windows. However, the subfolders can be
moved quite easily: create a new folder using the Windows Explorer (e.g.
D:\Shared) and move the files and subfolders in the folder Shared Documents (including
the saved files) to this folder. To make sure that the changes are applied in
the registry, the folders have to be moved by cut (CTRL-X)
and paste (CTRL-V)!
Finally there is still a manual registry change needed to change the storage location of the folder Shared documents (in this example D:\Shared). Therefore, the registry value Common Documents in the following two registry keys has to be changed (using the registry-editor):
HKLM\SOFTWARE\Microsoft\Windows\CurrentVersion\explorer\Shell Folders
HKLM\SOFTWARE\Microsoft\Windows\CurrentVersion\explorer\User Shell Folders
The folder Desktop can be moved similarly. But to my experience it is better to keep it where it is because in most cases it only cotains shortcuts to installed programs...
TIP: The necessary registry changes can be done with the free tool TweakUI as well (My Computer, Special Folders).
Moving the shared folder in Windows Vista
Windows Vista uses the subfolders of C:\Users\Public
to store the shared files: Public
Documents,
Public Pictures,
Public Music,
Public Videos,
Public Downloads and
Public Desktop and possibly some shared folders of installed
programs.
Moving these public folders is quite simple, but can only be done after User Account Control is temporarely disabled (Control Panel, sub User Accounts, option Turn user Account Control on or off) and the computer is rebooted. Create a new folder on the desired location using the Windows Explorer (e.g. D:\Public) and move the subfolders (files included) from the folder C:\Users\Public to the new folder. To make sure that the changes are applied in the registry, the folders have to be moved by cut (CTRL-X) and paste (CTRL-V)! After moving the folders, the yellow colored folders on the original location (if there) can be deleted safely.
ATTENTION: After disabling User Account Control, the folders can be moved by selecting Properties after right clicking them, tab Location as well. Because this has to be done for all folders separately, this procedure it takes some more effort.
Finally there is still a manual registry change needed to change the storage location of the folder Public (in this example D:\Public). Therefore, the registry value Public in the following two registry keys has to be changed (using the registry-editor):
HKLM\SOFTWARE\Microsoft\Windows NT\CurrentVersion\ProfileList
ATTENTION: Although simply copying the folder Public (including the subfolders) to the new location and applying the above registry change should be sufficient, it can cause problems for already installed programs. Therefore I advise to move the public folders as described above.
Programs which use the shared/public folder
The next step is to verify the programs which have stored files in the shared/public
folders. If they still refer to the original location, they need some special
attention like changing the registry key which stores the location of the shared/public
folder or reinstalling the program. This can be very annoying, therefore it is
wise to move the shared/public folders directly after a new Windows
installation.
TIP: In stead of the default folders for sharing files, one can also create a new folder and share it with all user accounts. By creating a shortcut to this folder on an easy accesible location (like the folder with personal documents of each user account), the shared files are quickly accessible by ever user. Keep in mind that there will be programs which will still use the default shared/public folders of Windows!
If the other user accounts are not allowed to view the personal files of the logged on user account, you have to make them private by changing the permissions of the folder. This is done most easily by making the folder private: right click the folder (e.g. D:\loginname\Documents), select Properties, tab Sharing and activate the option Make this folder private (the subfolders will be made personal as well).
ATTENTION: In Windows XP Pro this option is only available when in the Windows Explorer the option Use simple file sharing (Recommended) has been activated (by Tools, Folder Options, tab View).
Limitations of making folders private
This default procedure has a disadvantage: only the folders which are related to
a user account and have been created by Windows can be made private. This
procedure doesn't apply for folders created by the user! In case the created
folders for e-mail, contacts, favorites, RSS feeds or other data must be made
private, they have to be moved to a subfolder of
D:\loginname\Documents as well, to make them part of the already
private folder. As alternative, the storage location of the folder My documents (the original
folder on the C: partition) can be changed to D:\loginname (in
stead of
D:\loginname\Documents) which will result in a less deep tree
structure.
ATTENTION: Administrator accounts can take ownership of folders which have been made private by another user account. If this is undesirable, degrade all other administrator accounts to user accounts with less permissions (this can be done by the sub User accounts in the Control Panel)!
Using the tab Security to set the permissions
These problems which occur by making folders private can be overcome by
changing the permissions using the tab Security (these are available as
well by the properties of a folder). However, this tab is not available by
default: in Windows XP Home the computer has to be rebooted in safe mode (press
a few times the F8 button while booting Windows) and in Windows XP Pro by
disabling the folder option Use simple file
sharing (Recommended).
On the tab Security of the folder D:\loginname, change the permissions in a way that only the logged on user account has the permissions to read and write: right click the folder, select Properties, tab Security, button Advanced and deactivate the option Inherit from parent the permission entries that apply to child objects, resulting in the following window:
Select the button Remove to remove the currently set permissions. Right after removing the current permissions, add the logged on account using the button Add: enter the name of the account (e.g. Menno) and click the button Check Names. As soon as the added names have been recognized as one of the registered user accounts, the permissions for this account can be changed: click the button OK and change the status of the permissions to Full Control (first row) into Allow (all permissions below this row will change in the status Allow as well). After clicking twice on OK, a window is shown which shows that the specific user account is the only account which has full permissions for the personal folder.

TIP: In some cases it is wise to give the overall administrator account permissions to read and write the personal folders of the other accounts as well. Else it won't be possible to make an automated back-up of all personal files from all user accounts at once!
If the other user accounts are not allowed to view the personal files of the logged on user account, you have to make them private by changing the permissions of the folder (e.g. D:\loginname\Documents). Right click the folder, select Properties, tab Security, button Advanced, button Edit and deactivate the option Include inheritable permissions form this object's parent, resulting in the following window:
Select the button Remove to remove the currently set permissions. Right after removing the current permissions, add the logged on account using the button Add: enter the name of the account (e.g. Menno) and click the button Check names. As soon as the added names have been recognized as one of the registered user accounts, the permissions for this account can be changed: click the button OK and change the status of the permissions to Full Control (first row) into Allow (all permissions below this row will change in the status Allow as well). After clicking three times on OK, a window is shown which shows that the specific user account is the only account which has full permissions for the personal folder.
It is preferred to change the permissions before the personal data have been moved to the new location. Newly added subfolders will inherit automatically the same permissions.
TIP: In some cases it is wise to give the overall administrator account permissions to read and write the personal folders of the other accounts as well. Else it won't be possible to make an automated back-up of all personal files from all user accounts at once!
ATTENTION: Administrator accounts can take ownership of folders which are owned by another user account. If this is undesirable, degrade all other administrator accounts to user accounts with less permissions (this can be done by the sub User accounts in the Control Panel)!
© 2001-2022 - Menno Schoone - SchoonePC - Rotterdam - The Netherlands