
Nowadays, many households have more than one computer at home. Using a (wireless) gateway router, it is very easy to share your broadband internet connection (DSL, Cable). The advantages of a network (LAN/WLAN) are diverse: sharing files, sharing printers, wireless connections, printer server, fileserver, gaming, but the biggest advantage is simultaneously connecting to the internet. This page is a manual for creating a safe (wireless) network (how to share files and printers included).
Wireless router
Generally you can choose between two types of routers: wired or wireless. The
price difference is not that big, that's why I prefer to buy a wireless router (be
prepared for the future..... (if you don't use the wireless function of the
router, disable it!)). For a wireless router you can choose between different
speeds, I prefer the 54 Mbit router (the g-standard). Don't buy a 11 Mbit router
(b-standard), although this is probably still faster then your broadband
connection. The 54 Mbit standard is more stable and covers a bigger area (place
the wireless router central in your home, try some places for best performance).
Most routers have 3 or 4 connections for CAT5 ethernet cables, which means you are able to connect 3 or 4 computers wired. I prefer to connect as much as possible computers wired, unless you especially want it to be wireless (every wireless computer gives extra problems...). Don't use cross cables: they are used to connect to computers without a router!
TIP: Don't ever buy a cheap wireless router! I have seen many unexplainable troubles!
Ethernet modem
The ethernet modem is connected to the router (WAN port), so: every computer
connected to the router will be able to access the internet. I prefer to use the
ethernet modem, provided by your internet provider. If there is something wrong
with your internet connection, you won't be in troubles calling the helpdesk of
your service provider (you just temporarily remove the router...). If you are
using a modem which is not supported by the internet provider they probably
aren't able or willing to help you. This is also the case if you use a combined
modem-router!
Network adapter and UTP cables
All your computers must be provided with a network card/adapter (most computers
are provided with a network connection). This can be by PCI, USB or Cardbus
(laptop). If you are going wireless, I prefer to use the same manufacturer as
the router because of possible compatibility problems. You need CAT5 UTP cables
to connect your computers to the router.
TIP: CAT6-cables are preferred to realize a fast and stable connection if you are using a Gigabit-router/switch (1.000 Mbit instead of 100 Mbit).
|
|
There are multiple options to choose from for placing the modem and router. The best place for the modem is the location where the signal comes into your home, but in most cases it won't be a problem to extend the incoming line. For ADSL, the location of the modem depends on where the splitter is located. Knowing the modem and telephones both have to be connected behind the splitter, the splitter can be placed on a location where this is still the case. All telephones connected to the phone line must be connect behind a splitter (if necessary use multiple splitters or else use a DECT base station with multiple wireless phones spread over the house). Connect the modem to the splitter and the wireless router (with the cable in the WAN port) to the modem. By keeping all three on the same place, the use of cables will be limited. Both the modem and router must be within reach in case a reset is necessary.
CHOOSING THE BEST LOCATION FOR THE WIRELESS ROUTERThe quality of the wireless signal is sensitive for noise of DECT phones, microwave, electricity, reinforced concrete floors, e.a. Besides the noise, the quality of the signal can be poor, in which case a more central location for the wireless router has to be chosen. |
First, setup your ethernet modem following the instruction of your internet provider, without using the router. Most times, the ethernet modem supports DHCP, which means that the modem automatically gives an IP address to every connected computer. When there is an internet connection, the modem can be connected to the WAN port of the router. If the installation software can't find an ADSL modem, check whether the firewall is not blocking the connection by disabling the firewall.
NO INTERNET CONNECTION AFTER PROBLEMS WITH THE ELECTRICITYIf there have been problems with the electricity and you have no internet access anymore, reset your modem and router. Most times your problems are solved. |
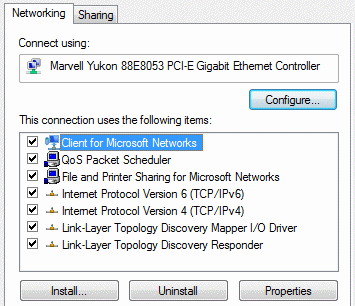
Connecting the computer to the modem, using a network cable, is simple. If a network adapter is not yet available (which is the case in very old computers), it has to be installed first. The network cable has to be connected to one of the available ports on the router, and the other end of the cable to the network adapter in the computer. Check the settings and whether a connection has been made (XP: the sub Network Connections of the Control Panel, Vista: the sub Network and Sharing Center of the Control Panel). Normally, the connection is generated automatically and the IP address is given automatically by the DHCP server of the build in router. In Windows Vista it is clear with a view on the Network and Sharing Center, in Windows XP the connection status is mentioned on the row of the network adapter (if the connection is disabled, right click on it and select Enable.
To change the Windows Vista connection settings, click View status in the Network and Sharing Center, button Properties. To change the Windows XP connection settings, right click the LAN connection and select Properties. Make sure the Internet Protocol TCP/IP is enabled and check the settings of the TCP/IP-protocol by clicking the button Properties, both TCP and DNS should be obtained automatically (obtaining an IP address automatically should be sufficient for a router with a DHCP server). Besides the default TCP/IPv4 protocol, the new TCP/IPv6 protocol is probably mentioned. If the v6 version is not supported (yet) by your internet provider, then there is no need to enable the TCP/IPv6 protocol. The QoS Packet Scheduler makes sure that important internet traffic (like VoIP) will be handled first. If there is no need for this feature, it can be disabled.
If you are not sharing files and/or printers on your Windows XP computer, disable the File and Printer Sharing for Microsoft Networks for the LAN connection (this will not disable the possibility to use shared files and printers on other computers). This gives a higher security level, because it's more difficult to reach your files.
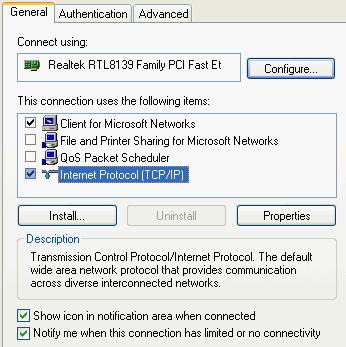
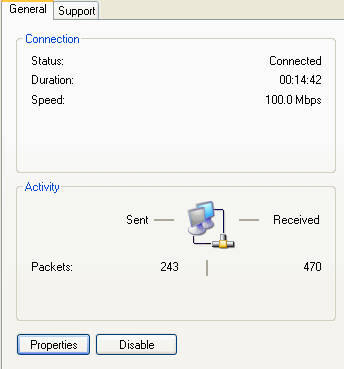
In Windows Vista, the icon for the internet connection is shown in the notification area (system tray) by default. This icon quickly shows the availability of the internet connection. In Windows XP, this icon can be activated as well by enabling the option Show icon in notification area when connected (as shown in the picture above). By double clicking the internet connection icon in the system tray, you are able to view the network connection. If it shows Received 0 bytes, there is no internet activity which means that there is a problem with the communication with the router. In this case, check the firewall settings, the cables and the router settings.
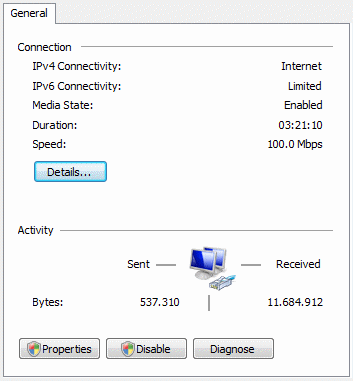
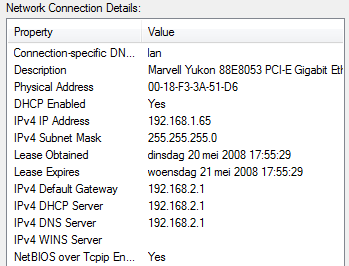
The button Details (Windows Vista) or the tab Support (Windows XP) shows the IP address the computer has received from the DHCP server (most cases it is something like 10.0.0.xxx or 192.168.1.xxx). In the example below it is assigned by the DHCP server of the router. The IP address is used for identification of the computer in the network and starts with the same range of numbers as the IP address of the router. The IP address of the router is mentioned at (IPv4) Default Gateway and usually starts with 10.0.0.xxx or 192.168.x.xxx. (by using this IP address in the Internet Explorer the router or modem settings can be changed in most cases). If the IP address starts with 169, there is something wrong with the connection settings.

In some cases (using Windows XP) there is still no internet connection. The reason can be simple: Internet Explorer doesn't know how to connect to the internet. Start Internet Explorer, Tools, Internet Options, tab Connections, you have to select Never dial a connection. Start the internet connection wizard as well by clicking the button Setup: select Next, option 1 (Connect to the internet), option 2 (Set up my connection manually) followed by option 3 (Connect using a broadband connection that is always on). The LAN-settings can be disabled (button LAN-settings).
DISABLE NETBIOS OVER TCP/IPProbably you are not using NetBIOS. If you don't, switch off this option to achieve a higher security level. This is done by editing the settings of the TCP/IP protocol as shown above. Select the Internet Protocol TCP/IP, button Properties, button Advanced, tab WINS, disable the option NetBIOS over TCP/IP. Note: now it's not possible anymore to find computers in your network using their name, use IP addresses instead. |
The next step is to setup the router. Enter the IP address of the router (e.g. 192.168.1.1) in the address bar of the Internet Explorer. In Windows Vista it is even easier: click the icon Network in the Network and Sharing Center to scan the network for connected devices. Right click the shown shortcut for the router and select View device webpage. Log in, using the default (username and) password (see the manual, in most cases it is admin). It is wise to change the password immediately.
The next step is to make a network connection to the modem which will give the computer a connection to the internet. In most cases, the default settings for the internet connection are fine. If not, search for something like Obtain IP automatically/Dynamic IP-address/DHCP. For internet with a cable modem, it is sometimes necessary to clone the MAC address of the computer into the router (the MAC address can be found with the button Details in the above picture under the name Physical Address). Save the new settings and reset the router. If there is still no connection, ask the manufacturers helpdesk of the router for assistance.
CHANGING THE DEFAULT LOGIN SETTINGSProvide your router and/or modem with a password, don't use the default password! Make notes of the new password and username (use a PrintScreen tool to make screen dumps of your router and/or modem settings). My advise would be to write them on a small paper and paste it at the bottom of the modem/router. |
WHAT IF THE CONNECTION HAS SUDDENLY GONE?If there suddenly is a problem with the connection, reset the computer, the modem and the router (by switching them off and on) before searching for the cause. Check whether the a computer/router is connected correctly and how fast the internet connection is using the PING command (example: PING 192.168.1.1, you should receive packages within a certain amount of time). The command can be given, using the Command Prompt which is started with the command CMD in the search field of the Start Menu. The command IPCONFIG /all can be useful to view the current internet connection settings, like the given IP address. |
RESETTING ROUTER TO FACTORY DEFAULTSIf you got messed up with your router and/or modem (forgotten password, ...), reset it to the default factory settings (read the (online) manual how to do that). |
HOW TO OPEN PORTS ON THE ROUTERIf you need to open a port on your router for some software application, but you don't know how or which port? Visit www.portforward.com for more information and details on most known routers! Be careful: opening ports is the same as removing the locks on your doors. Visit the page about the opening of ports in the modem/router for more information. |
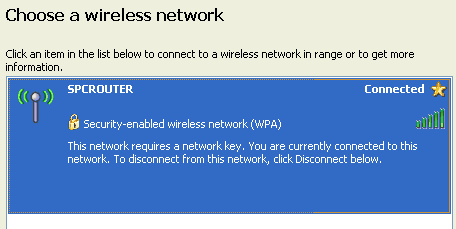
The first steps to create a wireless connection are not that difficult, the main issue is to setup a well secured connection. Start the internet browser, login on the router and change the settings for the wireless connection. One of them is the SSID, which is the name of the wireless network to be used to make a wireless connection. Use a SSID which can't be recognized by the neighbors and don't secure the wireless connection for the moment. Now it must be easy to connect to the wireless router. Double click the wireless icon in the system tray, and you will see all available wireless networks, yours included. Select the wireless network with the earlier given SSID to make a connection automatically. In the example below, the wireless network requires a network key because the wireless network has been secured with WPA.
SOME USEFUL TIPS FOR A GOOD WIRELESS CONNECTIONEnable G-only Select a channel with less noise The tool NetStumbler for XP (download: www.netstumbler.com) or Vistumbler for Vista (download: www.vistumbler.net) can be used to find out which frequencies the neighboring wireless networks are using (the networks included of which the SSID (the name of the network) has been hidden). The next step is to change the router settings, to make sure the wireless network operates on a frequency with less noise. But remember that setting the frequency as high as possible, might result in a bad wireless connection (or the network is not visible anymore) depending on the used wireless adapter. No icon for the wireless adapter available Disable the SSID broadcast MAC-Address control Preferred network |
A wireless router needs some extra attention, you need some extra security to make sure you are not providing your neighbors with free internet (and possibly also your personal data). If the wireless connection is not safe enough, the personal data (passwords, e-mail, Live Messenger chats, visited websites, internet favorites and possibly the banking and income tax information) is freely available by your neighbors! The wireless traffic needs to be encrypted to make sure nobody is able to use (or abuse...) your internet connection. Most routers support WEP and WPA/WPA2 encryption (if WPA/WPA2 is not available check for a firmware upgrade).
Using WPA/WPA2 is not that difficult. First you have to change the router settings to use a WPA key for encryption (or the even better WPA2 encryption). The next step is double clicking the wireless icon in the system tray. You will see your wireless network name (SSID), by selecting it you will be asked to enter the WPA key. If WPA/WPA2 is not supported by the wireless adapter, check the manufacturers website for software updates and make sure the latest Windows updates have been installed.
For the best type of data encryption, select AES (TKIP is a safe encryption as well, but not as good as AES). Use Pre Shared Key (PSK) as the key for gaining access to the wireless network, this is the password in the form of a sentence which is easy to remember. After the setup procedure of the wireless router has been finished, try to connect to the network by selecting the SSID (the given name of the wireless network) in the overview of available websites (the wireless network won't be visible if the SSID is not broadcasted by the router (hidden)). The wizard which will start after selecting the SSID, asks for the WPA key which has been set in the router. After typing the pre shared key (PSK), the connection to the wireless network will be realized.
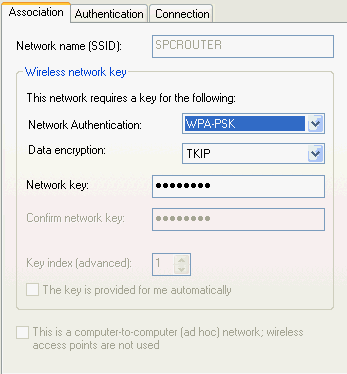
You can also check these settings manually by editing the wireless connection settings in advanced mode. On the tab Association you have to use the following settings after you have entered the SSID: select WPA-PSK (Pre Shared Key) in the first combo box and TKIP (Temporal Key Integrity Protocol) in the second combo box (as shown below), use the pass phrase (used by your wireless router) as network key.
WPA OR WEP ENCRYPTION?Instead of WPA/WPA2, it is also possible to use WEP encryption. WEP encryption is very easy to crack, you only need to capture a lot of package and calculate the original key! WEP uses the same key for every package send, while WPA/WPA2 changes the key for every single package (only the first package of the wireless connection is always the same, mostly a pass phrase). So, using WPA/WPA2 is much safer! If you have to use WEP encryption, make sure you regularly change the key. |
FREQUENT DROPS OF WPA CONNECTIONA dropping WPA connection is normal, you can always right click the connection
icon and select Repair if needed. Sometimes the wireless WPA connection drops to
frequently. If this is the case, make sure it's not caused by the
firewall, update the firmware
of the wireless router and/or the drivers of your wireless adapter. If the WPA wireless connection drops frequently because of noise,
try the following registry tweak: add the DWORD value AuthMode=2 in the
following key (only for Windows XP): If nothing helps, you have to go back to the less secured WEP encryption. Don't buy cheap wireless routers, always ask if you are allowed to return the router if it doesn't work to your satisfaction! |
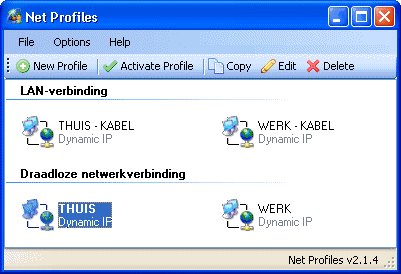
Users of mobile computers who switch frequently between (wireless) networks are familiar with the accompanying problems. Every time the computer connects to another network, all settings have to be changed manually. Fortunately, the tools Net Profiles (download: http://code.google.com/p/netprofiles/) and NetSetMan (download: www.netsetman.com) offer a solution to this problem! The settings for each network can be stored in a profile, which reduces the changes to be made to a single activation of the profile. The following settings can be stored in the profiles:
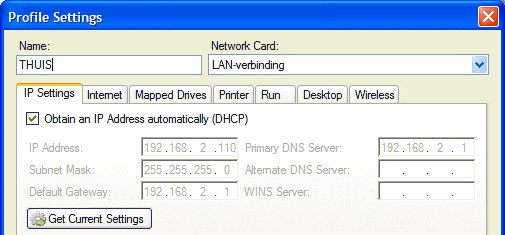
Net Profiles
With Net Profiles, a network profile can be activated automatically after
detecting the wireless network. The automatic switching between profiles can be
turned on or off by the menu bar: Options,
Don't Ask Before Auto Activating Wireless Profiles.
The automatic detection of a wireless network is only possible when there the SSID (the name
of the wireless network) on the tab Wireless
has been specified. If the switching between wireless networks is done manually,
then it is practical to add shortcuts on the desktop to the different profiles (which
is done by: File,
Create Desktop Shortcut).
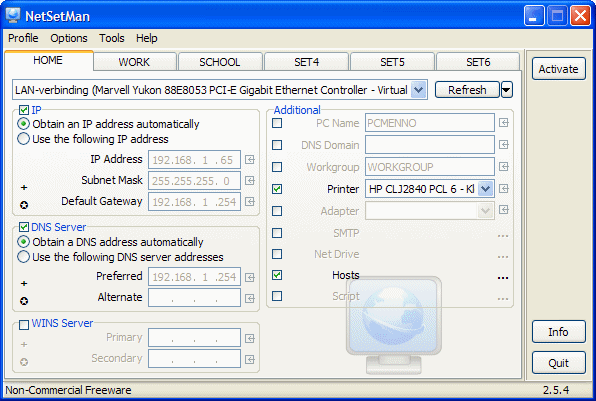
NetSetMan
NetSetMan strores the settings of each network profile on a separate tab.
The profiles can be activated quickly by right clicking the NetSetMan icon in
the systemtray but can be activated by the button Activate in the program
as well. NetSetMan is not able to automatically activate a profile after
detecting a network.
TIP: Have a look at the tool AutoRoute SMTP (download: www.mailutilities.com/ars) as well for the automatic change of the used SMTP-server for sending e-mail in case the internet connection chages.
If you have a wireless network, make sure you provide every PC with a firewall. But also if you don't have a wireless network it is better to secure your pc's with a software firewall. Nowadays security is important then ever! If you are sharing files and/or printers, you need to add exception rules to your firewall settings.
FIXED INSTEAD OF DYNAMIC IP ADDRESSInstead of a dynamic IP address (given by the DHCP server of the router), it is also possible to use a fixed IP address. Because of the fixed IP addresses, it is easier to find a shared folder (and printer), even if the router has been reset. |
TIP: Visit the page about sharing files with a mapped network drive how to share files with other computers in the network.
© 2001-2022 - Menno Schoone - SchoonePC - Rotterdam - The Netherlands