The functionality of the Windows Vista Security Center (available in the Control Panel) has been increased with a (more) advanced firewall, an improved Windows Update, Windows Defender to prevent the installation of spyware, User Account Control and the supervision of the security settings of the internet connection. This makes the Security Center the place for changes in the settings concerning many security issues. In addition to the Security center, the Network center (available in the Control Panel as well) has been added to Windows Vista. The Network and Sharing Center describes the security settings for the visibility of the computer in the local network and the settings for sharing of files and printers with other computers in the network. Both the Security Center and the Network and Sharing Center are described on this page.
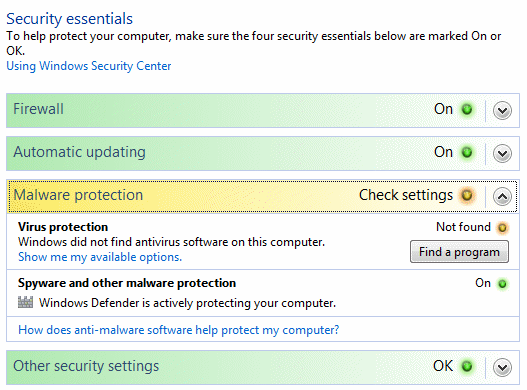
By default, Windows Vista does not contain virus scan software. That is the reason why the Security Center shows an orange colored shield in the system tray with the warning message that Windows is not sufficiently protected against viruses. This message also shows up when Windows does not recognize the installed anti virus software. If the security reaches a lower level in comparison to the default security levels, the Security Center comes up with a warning by showing an orange or even red colored shield in the system tray.
|
|
Disabling the Security center messages
If those warning messages are needless, disable them in the Security center,
Change the way
Security Center alerts me (at the left in the task pane), activate the option
Don't notify me and don't display the icon (not recommended). Disabling the
service Security Center
(which does not affect the installed security tools and settings) is more
drastic, but does also solves this issue. In both cases, the Security Center
will not show any alert messages anymore about the security issues.
TIP: There are multiple free virus scan software available for Windows Vista, like AVG Anti-Virus, AntiVir and AVAST. All are recognized by the Security Center.
After the setup of Windows Vista has been finished and the internet connection is established, Windows Update checks whether there are essential updates for Windows and the hardware. Manually checking for updates is easy with the option Windows Update situated in the Control Panel. The Windows Update function is not web based anymore (like the previous Windows versions), but integrated in the Windows software which results in a much faster update function. Checking for updates can be done for Windows only, but also for other Microsoft products (like MS Office). For the most enhanced consumer version (Windows Vista Ultimate) there are also Windows Ultimate Extras available, but the number offered is still astonishing low.
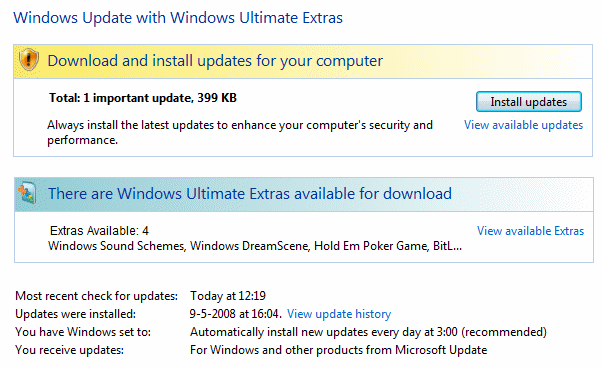
The button Install Updates will install the presented essential updates immediately. The option View available updates shows the optional updates. If an update must be ignored for any reason, hide the update by right clicking it and to select Hide update (restoring hidden updates is done by the option Restore hidden updates in the task pane).
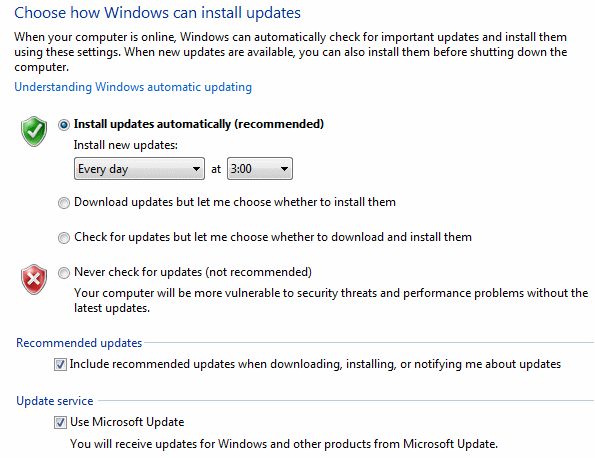
The option Change settings makes it possible to change the frequency, exact time and the type of updates. By default, all updates (optional and Microsoft updates included) are downloaded and automatically installed. If there are essential updates available, a shield will show up in both the taskbar and the on/off button in the Start menu. This indicates that the available updates will install automatically at shutdown. It is only advised to change those settings if the internet connection is slow or if the update of Microsoft software is not desirable.
TIP: For some updates, Windows asks the user to reboot the computer to finish the installation of the update. When there is still a user logged on, a reboot is not always desired. The automatic rebooting of Windows can be disabled by a change in the registry, in which case the update will be installed at the next boot. This is done by adding a new DWORD value NoAutoRebootWithLoggedOnUsers with the value 1 in the registry key HKLM\SOFTWARE\Policies\Microsoft\Windows\WindowsUpdate\AU (create the keys WindowsUpdate and AU manually if needed).
Windows Vista Service Pack 1 and 2
Service Pack 1 and 2 for Windows Vista can be downloaded and installed automatically
using Windows Update. Before Service Pack 2 can be installed, it is
necessary to install Service Pack 1 first (so the latest service pack doesn't
install the previous service pack!). Both service packs can be downloaded as
stand alone installation pack in the Microsoft's Download Center, which
are especially useful in case the service packs have to be installed on multiple
computers (to save time downloading the service packs multiple times through
Windows Update). Of both service packs there are two versions available: the
32-bits version and the 64-bits version (the downloads are quite large because this Service Pack can be used for all
Windows Vista languages):
Service Pack 1 (32-bits):
www.microsoft.com
Service Pack 2 (32-bits):
www.microsoft.com
Service Pack 1 (64-bits):
www.microsoft.com
Service Pack 2 (64-bits):
www.microsoft.com
ATTENTION: Disable the virusscan software before installing the service packs.
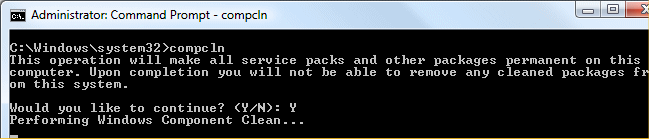
When the installation of both SP1 and SP2 are finished and working properly, then the files to undo the installation of the service packs can be deleted to saves a few Gb's of disk space! Deleting these files is done with the command COMPCLN (enter this command in the area Start Search of the Start Menu) followed by the Y-key to confirm the definitive deletion of the undo-files of Service Pack 1 and Service Pack 2. Attention: COMPCLN is only available after installing Service Pack 2 replacing the cleanup tool VSP1CLN from Service Pack 1.
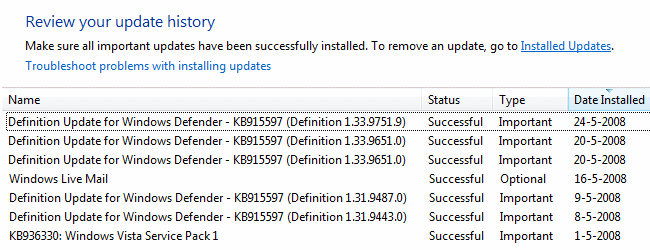
By default, Windows Update stores the update files in the folder C:\Windows\SoftwareDistribution. In time, Windows Update will download and install many updates. Because the downloaded update files won’t be removed after installation, this folder keeps growing. By deleting the already installed update files, a lot of hard disk space will become available for other purposes. This can be done by deleting the folder SoftwareDistribution (files included), which can only be done by first disabling the service Windows Update. Right click the service Windows Update (see the page Windows Services) and select Stop. The folder C:\Windows\SoftwareDistribution can be deleted a few seconds later. The update history (see the screen dump) will be deleted as well, but that causes no problem. Restart the service and Windows will recreate the deleted folder. The only thing left to do is to enable the option to update other Microsoft products at the bottom of the Windows Update-page (if Windows comes up with an errormessage, disable User Account Control temporarely at the moment the errormessage takes place to fix this problem permanently).
Problems with Windows Update are quite common: already installed updates keep coming back after a restart or Windows Update shows an error message and refuses to go on. Many of these problems can be solved easily by resetting Windows Update! This will delete the update installation files and the update history and restore the update function.
Resetting Windows Update
Before resetting Windows Update, it is necessary to stop the
service Windows update temporarily,
therefore right click this service and choose Stop. The next step is to
delete the (content of) folder C:\Windows\SoftwareDistribution (which
contain the update history and downloaded updates) using the Windows Explorer.
Although it is not necessary, this folder can be used as back-up by simply
renaming it to
SoftwareDistributionOrg (in stead of deleting the folder). After the
folder SoftwareDistribution has been renamed or deleted, the service
Windows update can be started again by right clicking it and to choose for
Start. By manually starting the search for updates, one can verify whether
the update function works properly now (if that is the case, the folder SoftwareDistributionOrg
can be deleted). If Microsoft Update was used before (for the automatic
installation of updates for all Microsoft products), then it has te be activated
again.
TIP: If resetting Windows Update didn't help, resetting the Internet Explorer settings might do the job (Tools, Internet Options, tab Advanced, button Reset). After resetting Internet Explorer it is necessary to reset the homepage and to change some settings. If there is still a problem with Windows Update after deleting this folder, make sure the service Windows Modules Installer is enabled.
Windows Firewall
The Windows Firewall settings can be
changed by the option Windows Firewall
of the Control Panel. The firewall
doesn't control the networkconnections individually anymore (like Windows XP
does) but verifies the incoming traffice of all the networkconnections together.
The tab Exceptions (available through the option Change settings)
makes it possible to change the settings (to allow or to block) for some programs individually. The more advanced Windows Firewall settings can be changed
by the shortcut Administrative Tools
of the Control Panel, Windows Firewall with advanced Security.
The
Windows Firewall can be disabled by deactivating the
service
Windows Firewall, but only do this if you have secured your
internetconnection with firewall
software (in most cases the Windows Firewall is disabled automatically
by a newly installed alternative firewall.
Windows Defender
Windows Defender (new in Windows Vista) offers additional security
against spyware and other malicious software.
If other security tools have been installed (or if you don't like it...),
Windows Defender can be disabled by disabling the
service Windows Defender
and deactivating the program on the tab Startup of the
system configuration tool MSCONFIG.
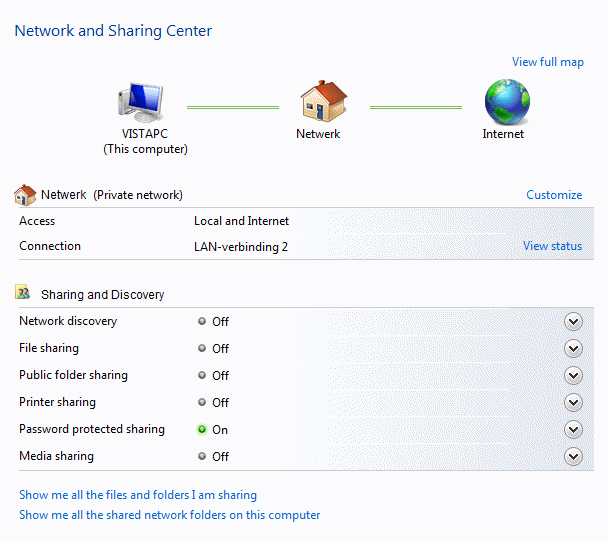
The Network and Sharing Center (available in the control panel) is the place to be to check the status, analyze and solve problems concerning the network. The Network and Sharing Center has settings for sharing files, printers and public folders. If there is no need to share files over the network, most options can be disabled (as shown in the screen dump) to raise the security level.
The link View computers and devices (at the left in the task pane) is used for quickly browsing the network with the Windows Explorer. This will show the connected router (but not the modem connected to the router), the shared (public) folders/files and the shared printers of the computers connected to the same network. Right click the hardware (modem, router) and select View device webpage to open the managementpage. There is no need anymore to type the IP-address into the addressbar of the Internet Explorer.
© 2001-2022 - Menno Schoone - SchoonePC - Rotterdam - The Netherlands