After the installation and optimization of Windows, it is time to clean up the unnecessary files of the hard disk. Deleting the unnecessary files, followed by a defragmentation of the hard disk improves system performances significantly. Do not expect miracles, but every small improvement is important. Because some files are secured, it is not always easy to delete files. But there are still a lot of files which can be deleted safely to create additional free space.
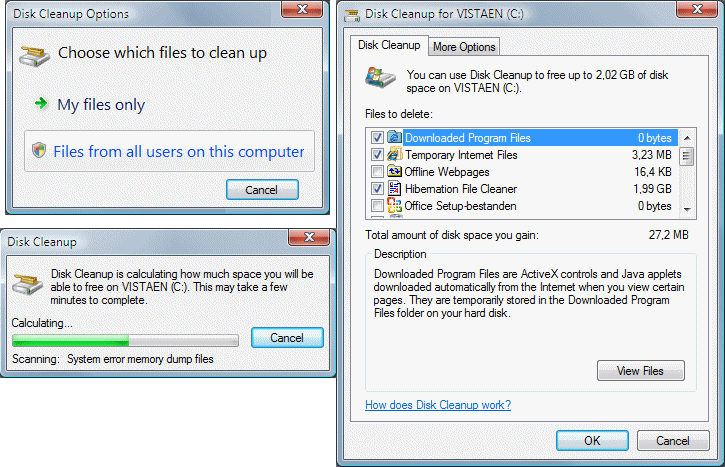
There are a lot of files stored on the hard disk during the installation of Windows and programs, some of them can be deleted safely afterwards (like the folder Windows.old with the files of the old Windows installation and the history of the browser). Most of these files can be deleted using the Disk Cleanup tool. Disk Cleanup is available by right clicking the Windows partition (the C: partition in most cases) in the Windows Explorer and select Properties, tab General, button Disk Cleanup, option Files from all users on this computer. On the first tab select all categories of files (except the Office Setup files, these can still be of use later on) and delete them by clicking OK.
|
|
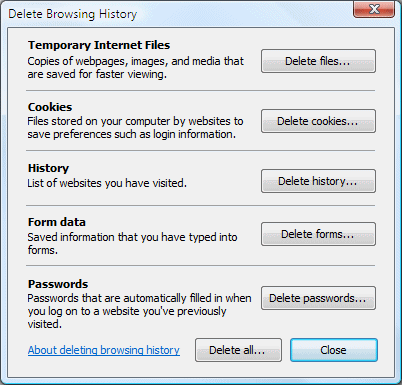
Disk Cleanup does not delete all files, afterwards there are still many hidden files which are not deleted (for example check the properties of the folder for temporary internet files). Deleting the browsing history (the temporary internet files and cookies included) is done more effectively using the Internet Options in the Control Panel, button Delete, button Delete files and button Delete cookies. Unfortunately this procedure has to be done for each user account separately.
The most important folders
The most important folders with (possibly
hidden) files to delete are on the following locations:
C:\Users\loginname\AppData\Local\Microsoft\Windows\Temporary Internet Files
C:\Users\loginname\AppData\Local\Microsoft\Windows\History
C:\Users\loginname\AppData\Local\Temp
C:\Users\loginname\AppData\Roaming\Microsoft\Internet Explorer\UserData\Low
C:\Users\loginname\AppData\Roaming\Microsoft\Office\Recent
C:\Users\loginname\AppData\Roaming\Microsoft\Windows\Cookies
C:\Users\loginname\AppData\Roaming\Microsoft\Windows\Recent
C:\Windows\Temp
The content of these folders can be deleted manually, therefore it is necessary to be able to view the protected and hidden files (available by Folder Options in the Control Panel, tab View). Tools like IE Privacy Keeper and Active@ Eraser are also able to delete those files easily (visit the page about deleting personal files and privacy issues for more information about these tools).
TIP: By right clicking a folder with files and select Properties you are able to view how much space can be recovered by deleting the files in the folder. By checking the additional free space after deleting the files in the folder, you are able to calculate how much space has actually became available. For example check the folder with temporary internet files after clearing the folder using Disk Cleanup. As you will see, the folder is not empty taken the folder size into account, but while opening the folder the files are not visible. Deleting those invisible temporary internet files is done by using the Internet Explorer (Tools, Internet Options, tab General, button Delete).
DELETING THE FLASH PLAYER-COOKIESOn many websites flash video is shown for advertising purposes. To track your surfing behavior, special Flash cookies are saved which can't be deleted the normal way (e.g. from the Internet Explorer by Tools, Internet Options, tab General, button Delete). Deleting the Flash cookies can be done by visiting the webpage www.macromedia.com/support/documentation/en/flashplayer/help/, click the link Website Privacy Settings Panel in the left pane, button Delete all sites. To prevent saving Flash cookies in the future, click the link Global Storage Settings Panel and deactivate the option Allow third-party Flash content to store data on your computer. |
C:\HIBERFIL.SYS (hidden, as big as the available RAM memory)
The hibernation file is a copy of the total RAM memory, which is used to recover
the computer from sleep (also known as hibernation). Hibernation is especially used for laptop
computers to save battery power, bus frequently used on desktop computers as
well. Enabling and disabling the hibernation
is done in the task pane of Power Options in the
Control Panel. If hibernation is not used, it is safe to disable it (if not done
already). The file size of HIBERFIL.SYS equals the total of RAM memory, so
deleting the file will save a lot of space!
Deleting the hibernation file is done most easily by the above mentioned tool
Disk Cleanup.
TIP: When the hibernation file has been deleted, but you would like to apply the hibernation feature? The command POWERCFG /hibernate ON in the Command Prompt (start menu, All programs, Accessories) will bring back the hibernation file. Start the Command Prompt with additional administrator rights by right clicking it and to select Run as administrator!
C:\System Volume Information (hidden)
This folder is necessary for the Windows Vista System Restore (and the
use of shadow copies to restore previous versions of files). By default, the system recovery is only applied
to the Windows partition (in most cases C:), but it is also possible to enable
it for the other partitions (by System in the Control Panel,
task Advanced system settings in the task pane,
tab System Protection). By
disabling System Restore for
every partition/disk, the earlier created restore points (necessary for the
recovery of unwanted system changes) are deleted
and the folder System Volume Information
will be emptied (but not deleted!). After disabling System Restore and
deleting the restore points as a result, it is no longer possible to recover
from any unwanted system changes! If System Restore has been turned on
again, a new restore point is created by clicking the button Create.
C:\PAGEFILE.SYS (virtual memory)
The paging file (the 'virtual memory') is stored on the hard disk and is
therefore slower then the RAM memory. The paging file is only used in addition
to the available RAM memory in case there is not enough RAM memory to run the
tasks of that moment. The paging file PAGEFILE.SYS is stored on the root
of the Windows partition by default. If there is a lot of RAM memory available (2 Gb or more),
and there are no programs requiring a lot of memory (like picture and video
editing software), it is safe to restrict the use (or even disable) the page
file. It is also wise to move the paging file to a (faster) partition.
Changing the paging file settings is discussed on the page about
optimizing the
Windows Vista settings.
C:\Windows\SoftwareDistribution
The folder SoftwareDistribution stores the
Windows/Microsoft Update
information including the downloaded and already installed updates. In time this
folder will become larger and larger as a result of many updates. Although this
information is not that important, it is not that easy to empty this folder.
Before deleting the folder SoftwareDistribution, it is necessary to stop
the service Windows
Update first (right click the service and select Stop, for more
information visit the page about
optimizing the Windows services).
After a few seconds the whole folder C:\Windows\SoftwareDistribution
(subfolders included) can be deleted, followed by a restart of the service (or a
restart of Windows). After the service is active again, this folder is recreated.
Because the update history and settings are gone, start Windows update to make
sure the update procedure still works fine. To upgrade Windows update to
Microsoft Update, to receive updates of more Microsoft products, click the
option Get updates for more products and accept the terms of use.
Be aware that this procedure solves many Windows Update problems!
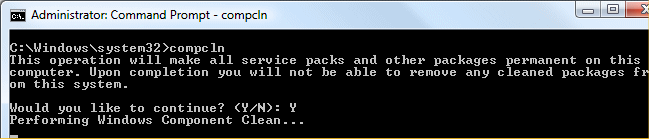
Delete the service pack undo files
When the installation of both SP1 and SP2 are finished and working properly, then the files
to undo the installation of the service packs can be deleted to saves a few Gb's of disk
space! Deleting these files is done with the command COMPCLN (enter this command in the area Start Search of the Start
Menu) followed by the Y-key to confirm the definitive deletion of the
undo-files of Service Pack 1 and Service Pack 2. Attention: COMPCLN is
only available after installing Service Pack 2 replacing the cleanup tool VSP1CLN
from Service Pack 1.
Windows Media Center media samples
The folder C:\Users\Public\Recorded TV\Sample Media contains some default
media samples which can be deleted safely.
Recycle Bin
Probably not necessary to tell,
but make sure the Recycle Bin is empty. This is done by right clicking the
Recycle Bin on the desktop, option
Empty Recycle Bin.
A tip for quickly deleting files and folders: the key combination
SHIFT-DEL
deletes without moving files and folders to the
Recycle Bin.
DELETING LOCKED FILESSometimes it's not possible to delete or move a specific file or folder because the file or folder is locked by a specific process. To find out which process is locking it, you can try to find out and stop the process with Process Explorer (download: www.microsoft.com/technet/sysinternals/ProcessesAndThreads/ProcessExplorer.mspx). The process can also be stopped with the Windows Task Manager (combine the keys CTRL-ALT-DEL), tab Processes. With the tool Unlocker (download: http://download.cnet.com/Unlocker/3000-2248_4-10493998.html) it is possible to unlock files and folders by stopping the locking process. If it isn't possible to stop the locking process, then the MoveOnBoot utility can be handy (download: www.gibinsoft.net, see FileUtililties, old version is freeware). This utility makes it possible to move or delete files at the next boot. |
SEARCHING FOR POTENTIAL HARD DISK SPACE...At this page many unnecessary folders/files are mentioned, which is a good start. If this still doesn't give you enough free space for you, it's time to do some further analysis to delete some extra files and/or folders (or if you are just curious...). The utility Disktective (download: www.freebyte.com/disktective) gives you this opportunity. Disktective shows by means of pie pieces the use of your hard disk. Another interesting utility is SpaceSniffer (download: www.uderzo.it/main_products/space_sniffer/), which shows rectangles. |
Before imaging the Windows partition, it is wise to defragment this partition first. A partition which is fragmented contains many files which are split up in fragments. This happens when the first available free area to store a file is not large enough to store the whole file. The remaining part is saved on the next available free area, which goes on until the whole file has been written to the partition. Because larger files take more space to save, they probably will be more fragmented. If the fragmented files are used frequently by the system, it will take relatively a lot of time to read them which will delay the processing. Defragmenting the hard disk will defrag those files which can improve the system performance significantly.
By default, defragmenting takes place daily as a background task. Because defragmenting has a low priority, it is normally not noticed by the user. When the automatic defragmentation is disabled (or the computer is switched off at the moments defragmenting is planned), it is also possible to start the defragmenting manually by the start menu, All Programs, Accessories, System Tools, sub Disk Defragmenter.
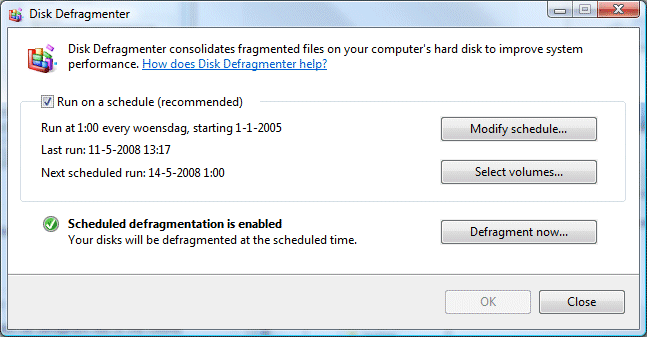
Click the button Defragment now in the Disk defragmenter window to start the defrag of all partitions manually. The button Select volumes is used for selecting/deselecting partitions to defrag.
DEFRAGMENTING THE WINDOWS REGISTERDefragmenting the Windows register will save system resources. On a newly installed Windows Vista, it is common to be able to compress the register by 10% or more. RegDefrag (download: www.regdefrag.com) is a freeware tool to do this job quickly. Visit the page about editing and defragmenting the registry for more information concerning this subject. |
© 2001-2022 - Menno Schoone - SchoonePC - Rotterdam - The Netherlands