Compared to previous Windows versions Windows 7 has less features: tools like Windows Mail, Windows Calendar, Windows Movie Maker and Windows Photo gallery are no longer available by default. By removing these tools, Windows goes back to a basic operating system where the user can decide which additional tools to install. Although these tools have been removed, Windows 7 still has a lot of interesting features. This page describes the following features: the magnifier, search, Windows Media Center, burning of CD/DVD's using the Windows Explorer, the command prompt, sticky notes, the snipping tool, the task manager, back-ups, the mobility center, the sync center, Windows mobile device center.
WINDOWS LIVE ESSENTIALSThe tools Windows Live Mail, Windows Live Photo Gallery, Windows Live Messenger, Windows Live Movie Maker, Writer, Windows Live Toolbar, Family Safety and Silverlight are now part of the Windows Live Essentials (download: http://download.live.com) and can be downloaded and installed separately (this new approach should make it a lot easier to keep them up to date). After installation, the Live programs are available in the Start menu, All programs, Windows Live. |
Is a part of the screen hard to read, the area can be magnified by pressing the Windows key in combination with the plus key (+). The more the + key is pressed, the more the screen is magnified. To undo press the Windows key in combination with the minus key (-).
The search feature is quickly available by the Start menu (Start, Search programs and files). By default the folders with personal files and the e-mail archive (both Windows Live Mail and Outlook) are indexed, which speeds up searching for content in those files. Indexing of files is a continuous process which takes place when the computer is not actively used. That's why it can take some time before all files are indexed; especially when there are many files to index.
|
|
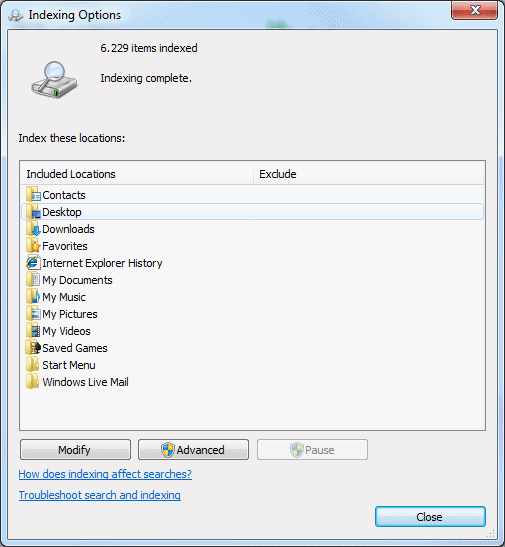
Changing the indexing options
Select Indexing
Options in the Control Panel to change the indexing settings. This window
shows how much files are indexed already. New files which are added to the
already indexed folders will be indexed automatically as well. To achieve the best
search results, it is important to let the system know which additional folders
to index. To add (or remove) folders to the already included locations click the button Modify, button
Show all locations
and select the folders to index. If the folders with personal files have been moved to a different location/partition, add the new location to the folders to
be indexed as well.
The button Advanced offers some additional settings, like rebuilding the index (if there seems to be a problem) or moving the indexing location (the location containing the indexed information, which is useful in case of restoring a system image). The page optimizing the Windows Services tells how to disable the search feature in case it is not used.
Using the Windows Explorer to search
The Windows Explorer can be used to search for files within
folders/partitions (the Windows Explorer search function is quite useful to find
a file in case the storage location is not known). If the location
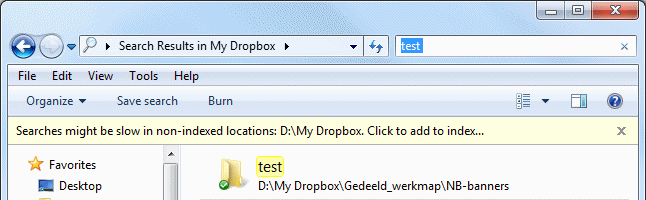
has not been indexed, searching can take some time (which is visually shown with
the horizontal bar which fills with the color green from left to right). In
some cases an additional yellow bar is shown with the remark Search might be slow in non-indexed locations: xxxx:\. Click to add to
index... . By clicking this bar, the location is added to the indexed
folders. To find a file, it is not necessary it is indexed but indexing will
speed up the searching process.
Windows Media Center can be used for multimedia purposes. If the computer has got a TV tuner which is supported by Windows Media Center, it is possible to watch TV (broadcasted by cable), unfortunately the number of internet broadcasts is limited. Using the online TV guide, favorite programs can be recorded and stored on the hard disk using the MPEG2 file format.
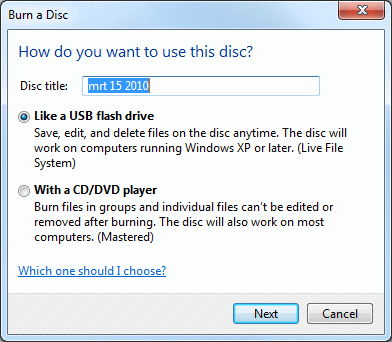
Within Windows 7 CD's and DVD's can be burned without additional software. Place a CD-R(W) or DVD±R(W) in the CD/DVD burner and if asked format it in the desired format. Copying the files to the burner, using the Windows Explorer and select the option Burn in the menu bar to burn the files on the CD/DVD. Burning music CD's is done with the Windows Media Player!
TIP: Windows 7 can burn ISO files (images of a CD/DVD's) as well, just by double clicking the file.
Parental Controls (available in the Control Panel) is the place to be to disable or limit the functionality (like the use of the PC and the internet connection) of the user accounts of your children. The first step is to make sure the other user accounts don't have access to the administrator accounts (see User Accounts in the Control Panel). The next step is to set time limits and to block games and websites. An activity report can be created on a daily or weekly base, to get an overview of the activities.
By default, the Command Prompt is not running with administrator rights, which limits the use of commands. Starting the Command Prompt with administrator rights can be done by right clicking the shortcut Command Prompt (Start menu, All Programs, Accessories) and to select Run as administrator. Running the Command Prompt as administrator by default is possible by right clicking the shortcut and to select Properties, tab Shortcut, button Advanced and to enable the option Run as administrator. The command CMD (in the search field of the Start menu) gives much quicker access to the Command Prompt. To run the Command Prompt as administrator, hold down the key combination CTRL-SHIFT while confirming the command CMD with the ENTER key.
Since Windows Vista, the Command Prompt has two new commands: MLINK (to create a link to a file or folder) and ROBOCOPY (to copy files with more options then the commands COPY and XCOPY). Use the commands MLINK/? and ROBOCOPY/? for a more detailed description of these new commands. The command MLINK is very useful to move the Windows Live Contacts and/or the RSS-feeds (for more information, visit the page changing the storage location of the personal folders). The options of the command CACLS (to display or modify the access control lists of files) has been limited, use the command ICACLS instead.
OPENING A FOLDER IN THE COMMAND PROMPTThe Command Prompt is started with the command CMD in the search field of the Start menu, just like in previous Windows versions. The Command Prompt however always opens in a default folder, navigating to the desired folder with the command CD always took some time and effort. A new option in the context menu (available by right clicking a folder in the right pane of the Windows Explorer) makes it possible to open a folder with a few mouse clicks. To be able to see the option Open Command Window Here in the context menu, hold down the SHIFT key simultaneously. |
Sticky Notes is one of the new Windows 7 features. By starting the program, a yellow sticky note is placed on the desktop. Addition notes are created with the + sign in the upper left corner. Use the key combination CTRL-B for bold, CTRL-U for underlined, CTRL-I for italic, CTRL-+SHIFT+L for a bullet list (repeat the key combination for other list types) and CTRL+SHIFT+> or < for a larger or smaller font size.

The Snipping Tool (Start menu, All Programs, Accessories) is a useful tool to capture (a part of) the current screen (have a look at the page about screen dumps as well). The Problem Steps Recorder is similar to the Snipping Tool and is started with the command PSR in the search field of the start menu. This tool uses multiple screen dumps to visualize how certain procedures have to be done. These screen dumps and the accompanying text are combined to one file which can be send as attachment by e-mail. Especially for long distance computer support this is a very useful tool.
Thanks to the Task Scheduler (available in the Control Panel, option Administrative Tools) many Windows tasks are triggered automatically and run when the conditions are met. One of those tasks is the weekly defragmentation of the hard drive (a default Windows setting), which can be found by Task Scheduler, Task Scheduler Library, Microsoft, Windows, Defrag. Double click a task to edit the settings. The different tabs and options speak for themselves. The option Create Task (in the right Action pane) makes it possible to add tasks, which is useful to automate certain tasks!
The Backup Center in Windows 7 can be used to create a backup of specific files and folders and/or to create an image of the whole hard drive (a system image). This functionality is very useful in addition to Windows System restore and/or the use of shadow copies of (personal) files.
Backup files
Backup and Restore (available in the Control Panel) can be used
to create a backup of files and folders and to store them on a another partition,
second hard drive, a network location, an external hard drive or to burn them on
a CD or DVD. After creating the first backup, a synchronization task can be
planned to make sure that the future changes will be added to the
backup as well. Because the backup procedure is a background process the computer can be used as usual.

Unfortunately, there are not that many settings available. Besides that, an automated backup procedure is not always the best available option (especially in case of an external hard drive which first needs to be turned on). An automated backup procedure also has the disadvantage of accidently overwriting backup files with incorrect files. That's why synchronization software like SyncBack and/or Dropbox (download: www.dropbox.com) with online storage are a better alternative to the automated Backup Center.
TIP: The Action Center shows a message frequently when a back-up procedure is not set yet. When the Windows Backup warning message is not needed, disable it by the control panel, item Action Center, task Change Action Center settings.
Backup entire computer
The Backup Center makes it possible
to create an image of the whole Windows partition as well. Although this backup
procedure is very fast, it takes a lot of space to store the image. The image
can be restored with the advanced boot options of the safe mode (press F8
while Windows boots) or by booting the Windows 7 installation DVD (select Repair your computer,
select the Windows 7 operating system to
repair and select Windows Complete PC
Restore in the window System Recovery Options). When there is no
original Windows installation DVD go to the control panel, item Back-up and
Restore, task Create a system repair disc and burn the bootable
system repair CD/DVD
which can be used to restore a backup of the entire computer when needed. This CD/DVD
can be very useful as well for System Restore and other booting problems as well!
TIP: For creating and restoring a system image, external software can be used as a better alternative. It takes more time to set it up, but creating and restoring an image will be faster and more efficiently.
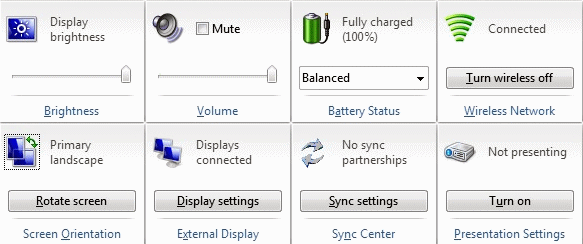
The Windows Mobility Center (available in the Control Panel) offers a quick access to multiple functions and configuration settings for mobile computing. The Center offers functions like adjusting the volume level, connecting a second display, battery status, screen brightness and turning on/off the wireless network. The Mobility Center is also available with the key combination Windows key-X.
The Sync Center (available in the Control Panel) is used for synchronizing multiple computers and mobile devices. Synchronizing is only possible if both computers are attached to the same network and one of the computers has access to a shared folder on the other computer. For every connected computer, a synchronization partnership has to be created to make sure that the Sync Center automatically starts the sync job after the hardware is connected to the computer or the shared folder becomes available. For synchronizing mobile devices (like a PDA or MDA), the Windows Mobile Device Center is the place to be (see below). In combination with the Sync Center it makes sure that mobile devices stay synchronized.

Offline access to shared network folders
By making network files offline available, you have access to copies of the
network files even when these files are unavailable for the moment because the
computer is turned off or temporarily not attached to the network. If the
network location becomes available again, a synchronization of both locations
will start. At synchronization the original network files will be overwritten by
the offline files (or the local offline files will be overwritten by the network
files in case someone else made changes to it). A network folder becomes offline
available by right clicking the folder and to chose for Always available
Offline. A mapped network drive (where a disk letter is attached to the
shared network folder) can be made available offline as well (press the left ALT
key to show the Windows Explorer menu bar, Tools, Map Network Drive, for
more information visit the page about
sharing files
with a mapped network drive). Click Offline Files in the Control
Panel to view the current offline files and to make some changes to the default
settings. Visit the page
automatically backup and restore files with SyncBack for alternative
synchronization software.
Synchronizing a mobile device (PDA, MDA) is done by the Sync Center. To get full functionality, additional software (Windows Mobile Device Center) must be downloaded and installed. Without this software, it is not possible to synchronize the mobile device with Microsoft Outlook in the Sync Center. This software is downloaded and installed automatically after connecting the mobile device, but is also available on the Microsoft website (www.microsoft.com).
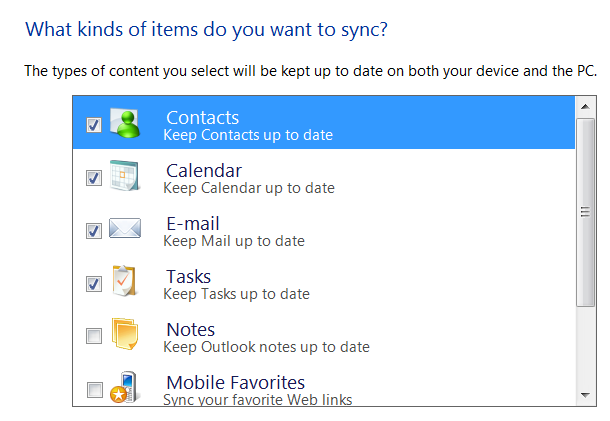
After installing the additional software for the Windows Mobile Device Center, it becomes easy to create a partnership. In the new center the synchronization settings for the contacts, Calendar, e-mail, task, notes, mobile favorites and files can be changed. After changing the default settings, the mobile device will be synchronized automatically after the connection with the computer has been made (the icon for the Sync Center will be shown in the system tray). Visit the Microsoft website for more information.
© 2001-2022 - Menno Schoone - SchoonePC - Rotterdam - The Netherlands